Snapshots
Curves can be saved on disk for subsequent loading, allowing for comparison between mixes, comparison to a reference spectra, etc.
A snapshot contains the state of the curves at the time it was taken:
- Channel spectra.
- Transfer function.
- Impulse response.
A snapshot, as implied by the name, is like a picture of the whole application at a given time. A snapshot contains all the data to save the current signal analysis as displayed on screen, and restore it at any given time, as well as to make comparisons between different locations, setups, etc.
Usage
Snapshots
Any number of snapshots can be stored and recalled for further use, and are organized into a group container called a project.
Please keep in mind computing and displaying the data associated with a snapshot is not free in terms of processing power and memory. How many snapshots you can use at a time will depends on your particular configuration.
Project
FLUX:: Analyzer creates a default project at startup, which the snapshots will be added to. Projects are stored on disk as a folder containing associated data files. Projects can therefore be renamed, moved, archived and transferred between computers using any method you wish, provided you include all data files inside the project folder.
You can save and reload as many projects as you want, disk space permitting.
Projects are saved in
<User folder>/FLUX SE/Pure Analyzer System/Data/<Project Name> >
Controls
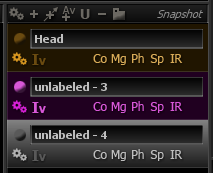
The snapshot area shows a list view, where one or more snapshots can be selected. The selected snapshot(s) will be highlighted accordingly, both in the list and the corresponding display(s), with increased curve thickness.
Add new snapshot
Clicking the  icon immediately creates a new snapshot, stores it on disk, in the folder, adds it to the current project and selects it.
Acquire sweep
The  button launches acquisition of a sweep snapshot. This special type of snapshot automates the acquisition of transfer function and impulse response curves using a swept sine generator output.
Please check the following for proper operation:
- Generator output Signal types should be properly assigned to the corresponding hardware channels .
- Hardware IO should be properly configured and set to hardware output(s).
- Sweep start/end frequencies should be set as desired.
Providing the previous requirements are met, a progress dialog will then be displayed until all data has been acquired and the snapshot is computed and ready for display.
Ensure the outputs of the generator and the connected speakers are set to reasonable levels in order to prevent damage to your equipment and hearing loss.
Create average
Click the  button with multiple snapshots selected to create a new snapshot average of these.
The new snapshot curve data is computed from the selected snapshot data as follows:
- Spectrum magnitude: average of magnitude vectors.
- Transfer function magnitude: average of magnitude vectors.
- Transfer function phase is set to zero as there is no mathematically significant meaning to averaging of potentially unrelated phase spectra.
- Transfer function coherence: average of coherence vectors.
- Impulse response: average of signals.
The averaging can only be performed if the snapshots are compatible with one another, that is they have identical:
- Sampling rate.
- Number of channels.
- Spectrum type.
- Impulse response length.
A warning message will inform you the averaging cannot be performed if one of the above conditions are not met.
The snapshot average stores the average of the snapshots at the moment it was created.
If you change the snapshots in any way, the snapshot average will not change.
Update current
Clicking the  button will overwrite the last selected snapshot contents with the most current data.
This is especially useful when you are fine-tuning your measurement setup and only want to keep the latest one, without creating several snapshots and deleting them afterwards.
This function is destructive: there is no means to revert the original snapshot data.
Load project
Opens a dialog box where you can select an existing folder containing a previously saved project.
To create a new empty project, creating a new folder and name it, then selecting using in this dialog.
Curve visibility
For each snapshot, you can control which curve should be displayed. These controls are intended to select only those curves that you really need to be displayed when there are many visible snapshots, and still maintain a legible display:
- Transfer function coherence.
- Transfer function magnitude.
- Transfer function phase.
- Magnitude spectrum.
- Impulse response.
The default visibility of newly created curves can be customized in Display defaults.
Color
Opens up a color selector dialog where you can manually set the color used to identify the snapshot, both in the list and as a curve.
Name
By the default, newly created snapshots are given the name
Invert (Iv)
Inverts the magnitude curve of the Transfer function.
Setup
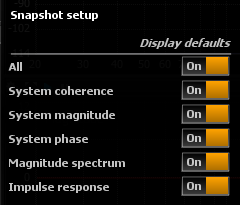
Snapshot setup options
Name
You can here define a new project name which will ultimately create a new folder in the user data folder <User folder>/FLUX SE/Pure Analyzer System/Data/<Project Name>
Display defaults
Toggles the default curve visibility applied to newly created snapshots.
‘All’ controls whether new snapshots should be visible by default, and you can fine-tune which curves should also be shown/hidden here.