Ableton Live Tools for SPAT Revolution
This guide is also available as YouTube Videos.
Introduction
This is a complete guide of a workflow with a set of custom-built Ableton Live Devices, created to increase significantly the compatibility between the DAW and SPAT Revolution.
We will focus on everything from downloading and installing the tools, setting them up, optimizing your computer, a complete description of the provided tools, and then the actual workflow and how to create an entire project in the most efficient way possible!
Why use Ableton Live with SPAT Revolution?
Maybe Ableton Live is your main DAW, so it is the most obvious choice. This is the case for some of us at FLUX:: and is also why we created this workflow in the first place, but we would also like to add, that Live could be an excellent choice for anyone getting into creating, sound designing, etc… in an Immersive Audio Context.
The capabilities of Ableton Live in terms of automation are monstrous, making this DAW an incredible tool for making great Immersive Audio content that will include lots of spatial movements and effects.
Why use SPAT Revolution at all?
Immersive Audio is gaining more and more traction recently, with Apple Spatial Audio, Dolby Atmos, and Binaural. You may have heard of those if you have worked in the music industry at any level these past few years.
So SPAT Revolution will help you to create and to expand ideas into a whole new world or should I say, into new spaces!
And now, after reading this guide, it will be as easy as making good old fader automation, as this is not just a do this and it will do that guide, but more of a do this and here why it does that, type of guide!
This guide works as a base and not an “end all be all”, any ideas on how to improve this workflow, the devices provided, the templates, and any other type of feedback are very welcomed!
Disclaimer: This workflow has been specifically considered for maximum compatibility between Ableton Live and SPAT Revolution under macOS. Some parts of this guide (mainly the devices provided) can still be applied to Windows or/and other DAWs.
Demo
Installation
If you already have a FLUX:: account and an iLok account and already have a SPAT Revolution License or Trial, you can jump to the next section of the guide.
You can also follow this part with the dedicated video:
- So, we are going first to create our FLUX:: account.
Don’t forget that you need to activate your account; an email will be sent to your email address.
(if you don’t see it, please check your spam inbox or search for the email directly using its name: “email address verification”)
- Once your FLUX:: account has been created, we are now going to create an iLok account.
For those who don’t know, iLok is simply a license platform and will allow us to activate our SPAT Revolution license.
Same as for the FLUX:: account, don’t forget to activate your account with the email sent to you.
We will now download the FLUX:: Center and the iLok License Manager app.
Download:
- FLUX:: Center: https://www.flux.audio/download
- iLok License Manager app: https://ilok.com
Now that both accounts have been created and activated, and both the FLUX Center and iLok license manager apps have been downloaded and installed, we can now link our iLok account to the FLUX:: account.
To do so, simply go into the iLok Licenses section of your FLUX:: account, and follow the procedure.
The last step is to go into the trial section and request a trial for SPAT Revolution Ultimate or Essential. The license will be automatically placed on your iLok account.
Now open the iLok License Manager app and activate your license by dragging and dropping it to your computer. You can then close the iLok app and open the FLUX:: Center.
Connect to your FLUX account and download the SPAT Revolution; when you download the SPAT Revolution, the plugins and the Ableton Live Tools for SPAT Revolution will also be automatically installed.
Tools
macOS
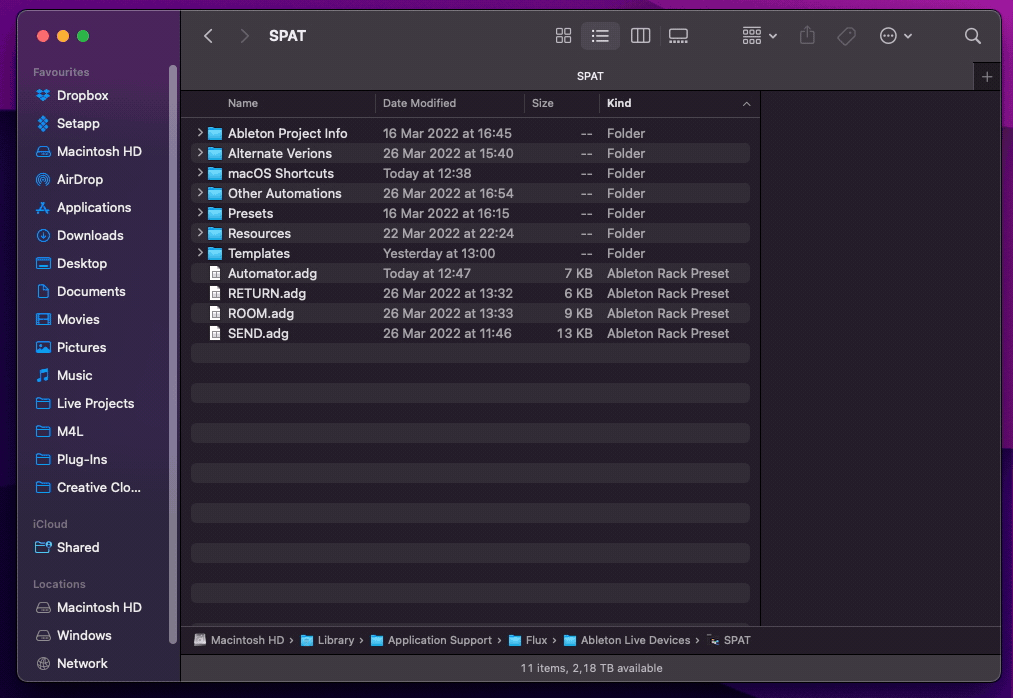
Once the SPAT Revolution and the Ableton Live Tools for SPAT Revolution have been installed from the FLUX:: Center, you can look for them in the following folder /Library/Application Support/Flux/Ableton Live Devices/SPAT
It is possible to go to the folder location by opening the Finder and, using the shortcut: CMD + Shift + G and copying the previous address.
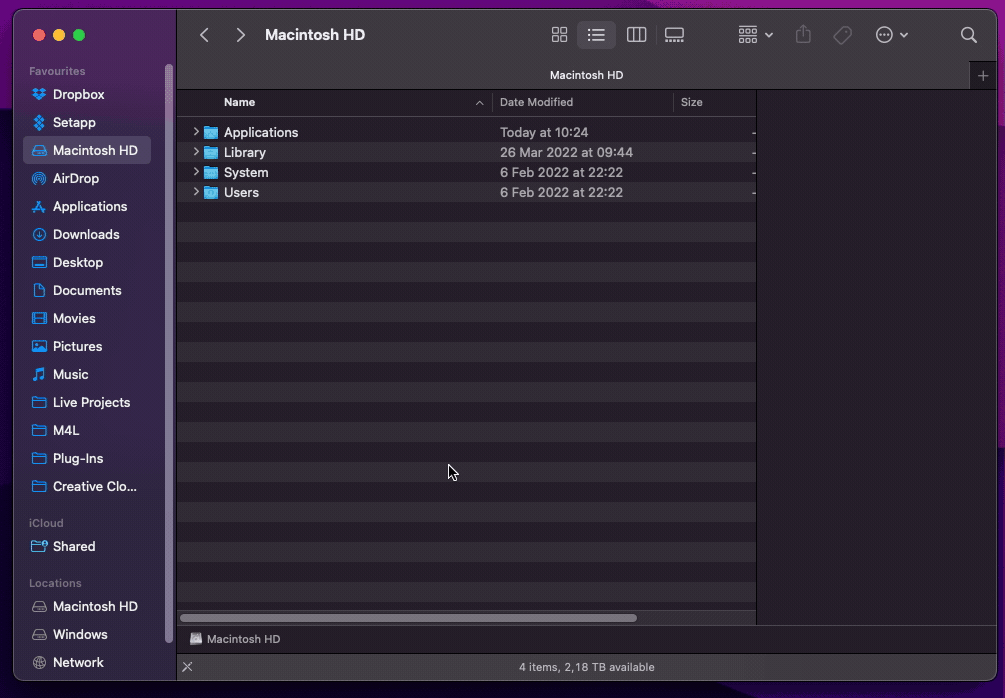
Please do not change the location of this folder.
To go faster later, you can add this folder to your Finder’s sidebar:
Windows
If you are on Windows and want to use the devices, please download the archive from this link: download
You can place it anywhere on your computer and then add the folder to your Ableton Live using the Add folder in the sidebar of Live.
Virtual Audio Driver
For this workflow to work, we must get some Virtual Audio Drivers to route audio from Live to SPAT Revolution.
For our Virtual Audio Driver, BlackHole from Existential audio is my preferred choice as it is simple to install, has many options in terms of channel count, is free, and is open-source!
You can also have all the different versions (2ch/16ch/64ch) installed simultaneously and have a different use for them simultaneously. We will see later in the guide that there are many ways this can be very helpful and how to take advantage of that, So my advice is to install them all.
BlackHole virtual audio driver can be found here
If you plan to have a dual computer setup, you don’t have to get BlackHole. More on that workflow later.*
Useful addition
Software such as Loopback from Rogue Amoeba can be handy to route audio between multiple devices/apps and can be an excellent alternative to Aggregate and Multi-Output devices that you can already make inside the Audio MIDI setup of macOS.
Don’t forget to restart your Mac after installing all that.
Optimization
Now that everything is installed, let’s optimize a few parameters in your macOS before getting into the setup.
When working with SPAT Revolution, and this can extend to any other audio work, you do not want any interference or background apps refreshing that would consume even the tiniest bit of CPU, so disabling Bluetooth, Wi-Fi as well as AirDrop is a great way to start and very simple to do.
You can simplify it using the provided Shortcuts package we created to do just that. They are located in the same folder as the other device so: /Library/Application Support/Flux/Ableton Live Devices/SPAT/macOS Shortcuts
What are Shortcuts?
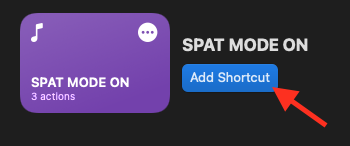
Shortcuts is simply an app (native in macOS) that lets you combine multiple steps across multiple apps to create powerful task automation. To add the provided Shortcuts, double-click each of them and select the Add Shortcut button.
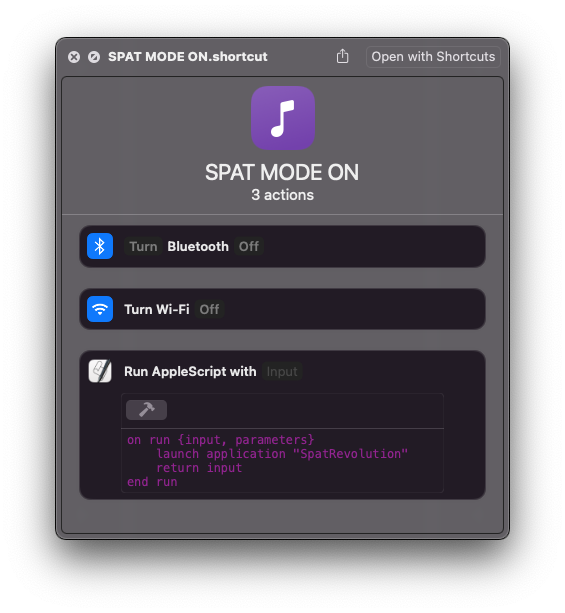
You will have three shortcuts available:
SPAT MODE ON: will disable WI-FI, Bluetooth, AirDrop, and start-up SPAT Revolution if it is not already running.
SPAT MODE ON with WI-FI: all the same as the previous one but will let the Wi-Fi on if you plan to use OSC control devices via Wi-Fi.
SPAT MODE OFF: will start back the WI-FI, Bluetooth, and AirDrop.
These shortcuts are very simple to make using the Shortcuts app inside macOS if you want to modify them or make them yourself:
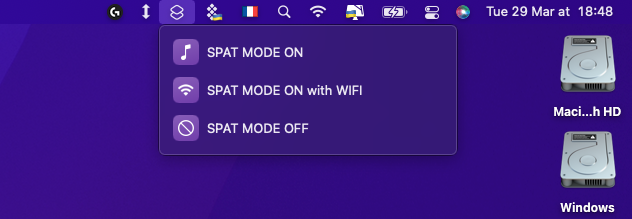
Once added, they should appear in your top bar for easy access:
Of course, you do not have to do this at all; everything else should work properly anyway, this is to save you a bit of CPU.
Setup
Ableton Live
Before getting into the workflow, we must set up just a few things inside Live and SPAT Revolution.
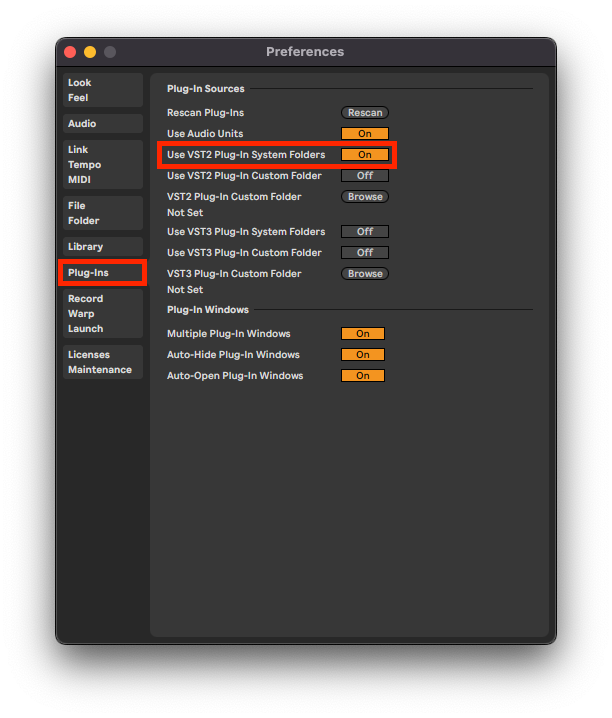
So open Ableton Live and configure the following:
- Make sure Live is scanning for VST2 plugins
If you work with a MIDI controller, we also highly recommend that you go into the Live Preferences, into the MIDI tab and change the Takeover Mode to Value Scaling so that parameters you play with don’t get too jumpy.

- Set BlackHole as your Output Device and enable all the channels of the driver:
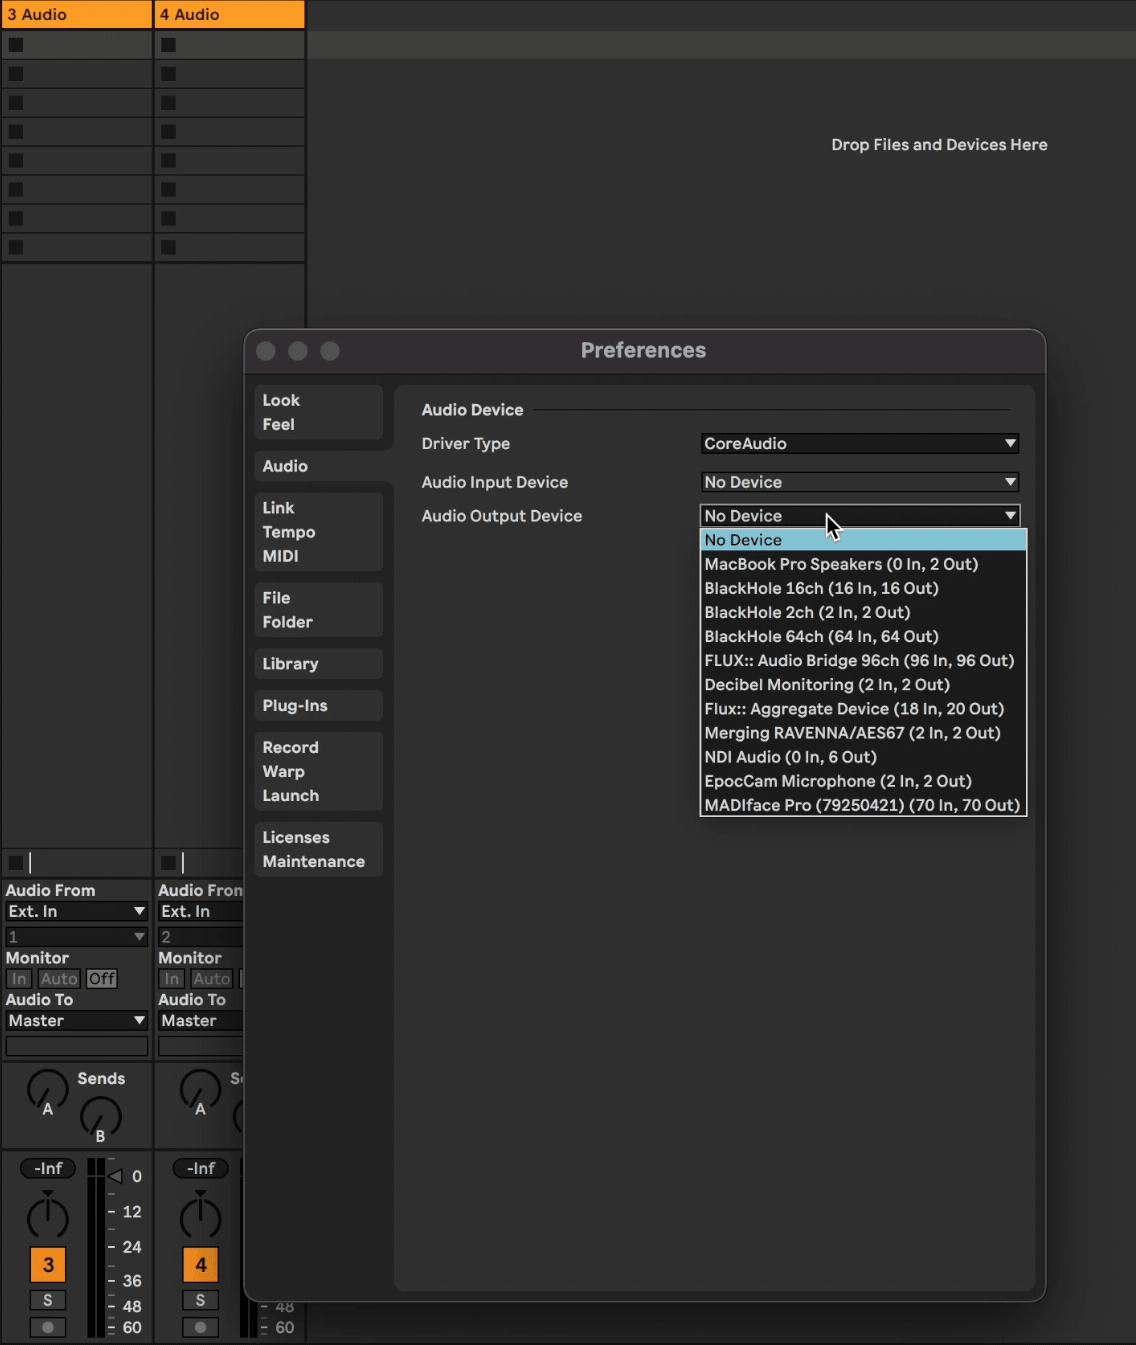
You can do this part when you need more channels, the only advantage of doing it now is that you don’t have to do it later!
- Add the SPAT folder containing the Tools using the
add folderin the sidebar of Live:
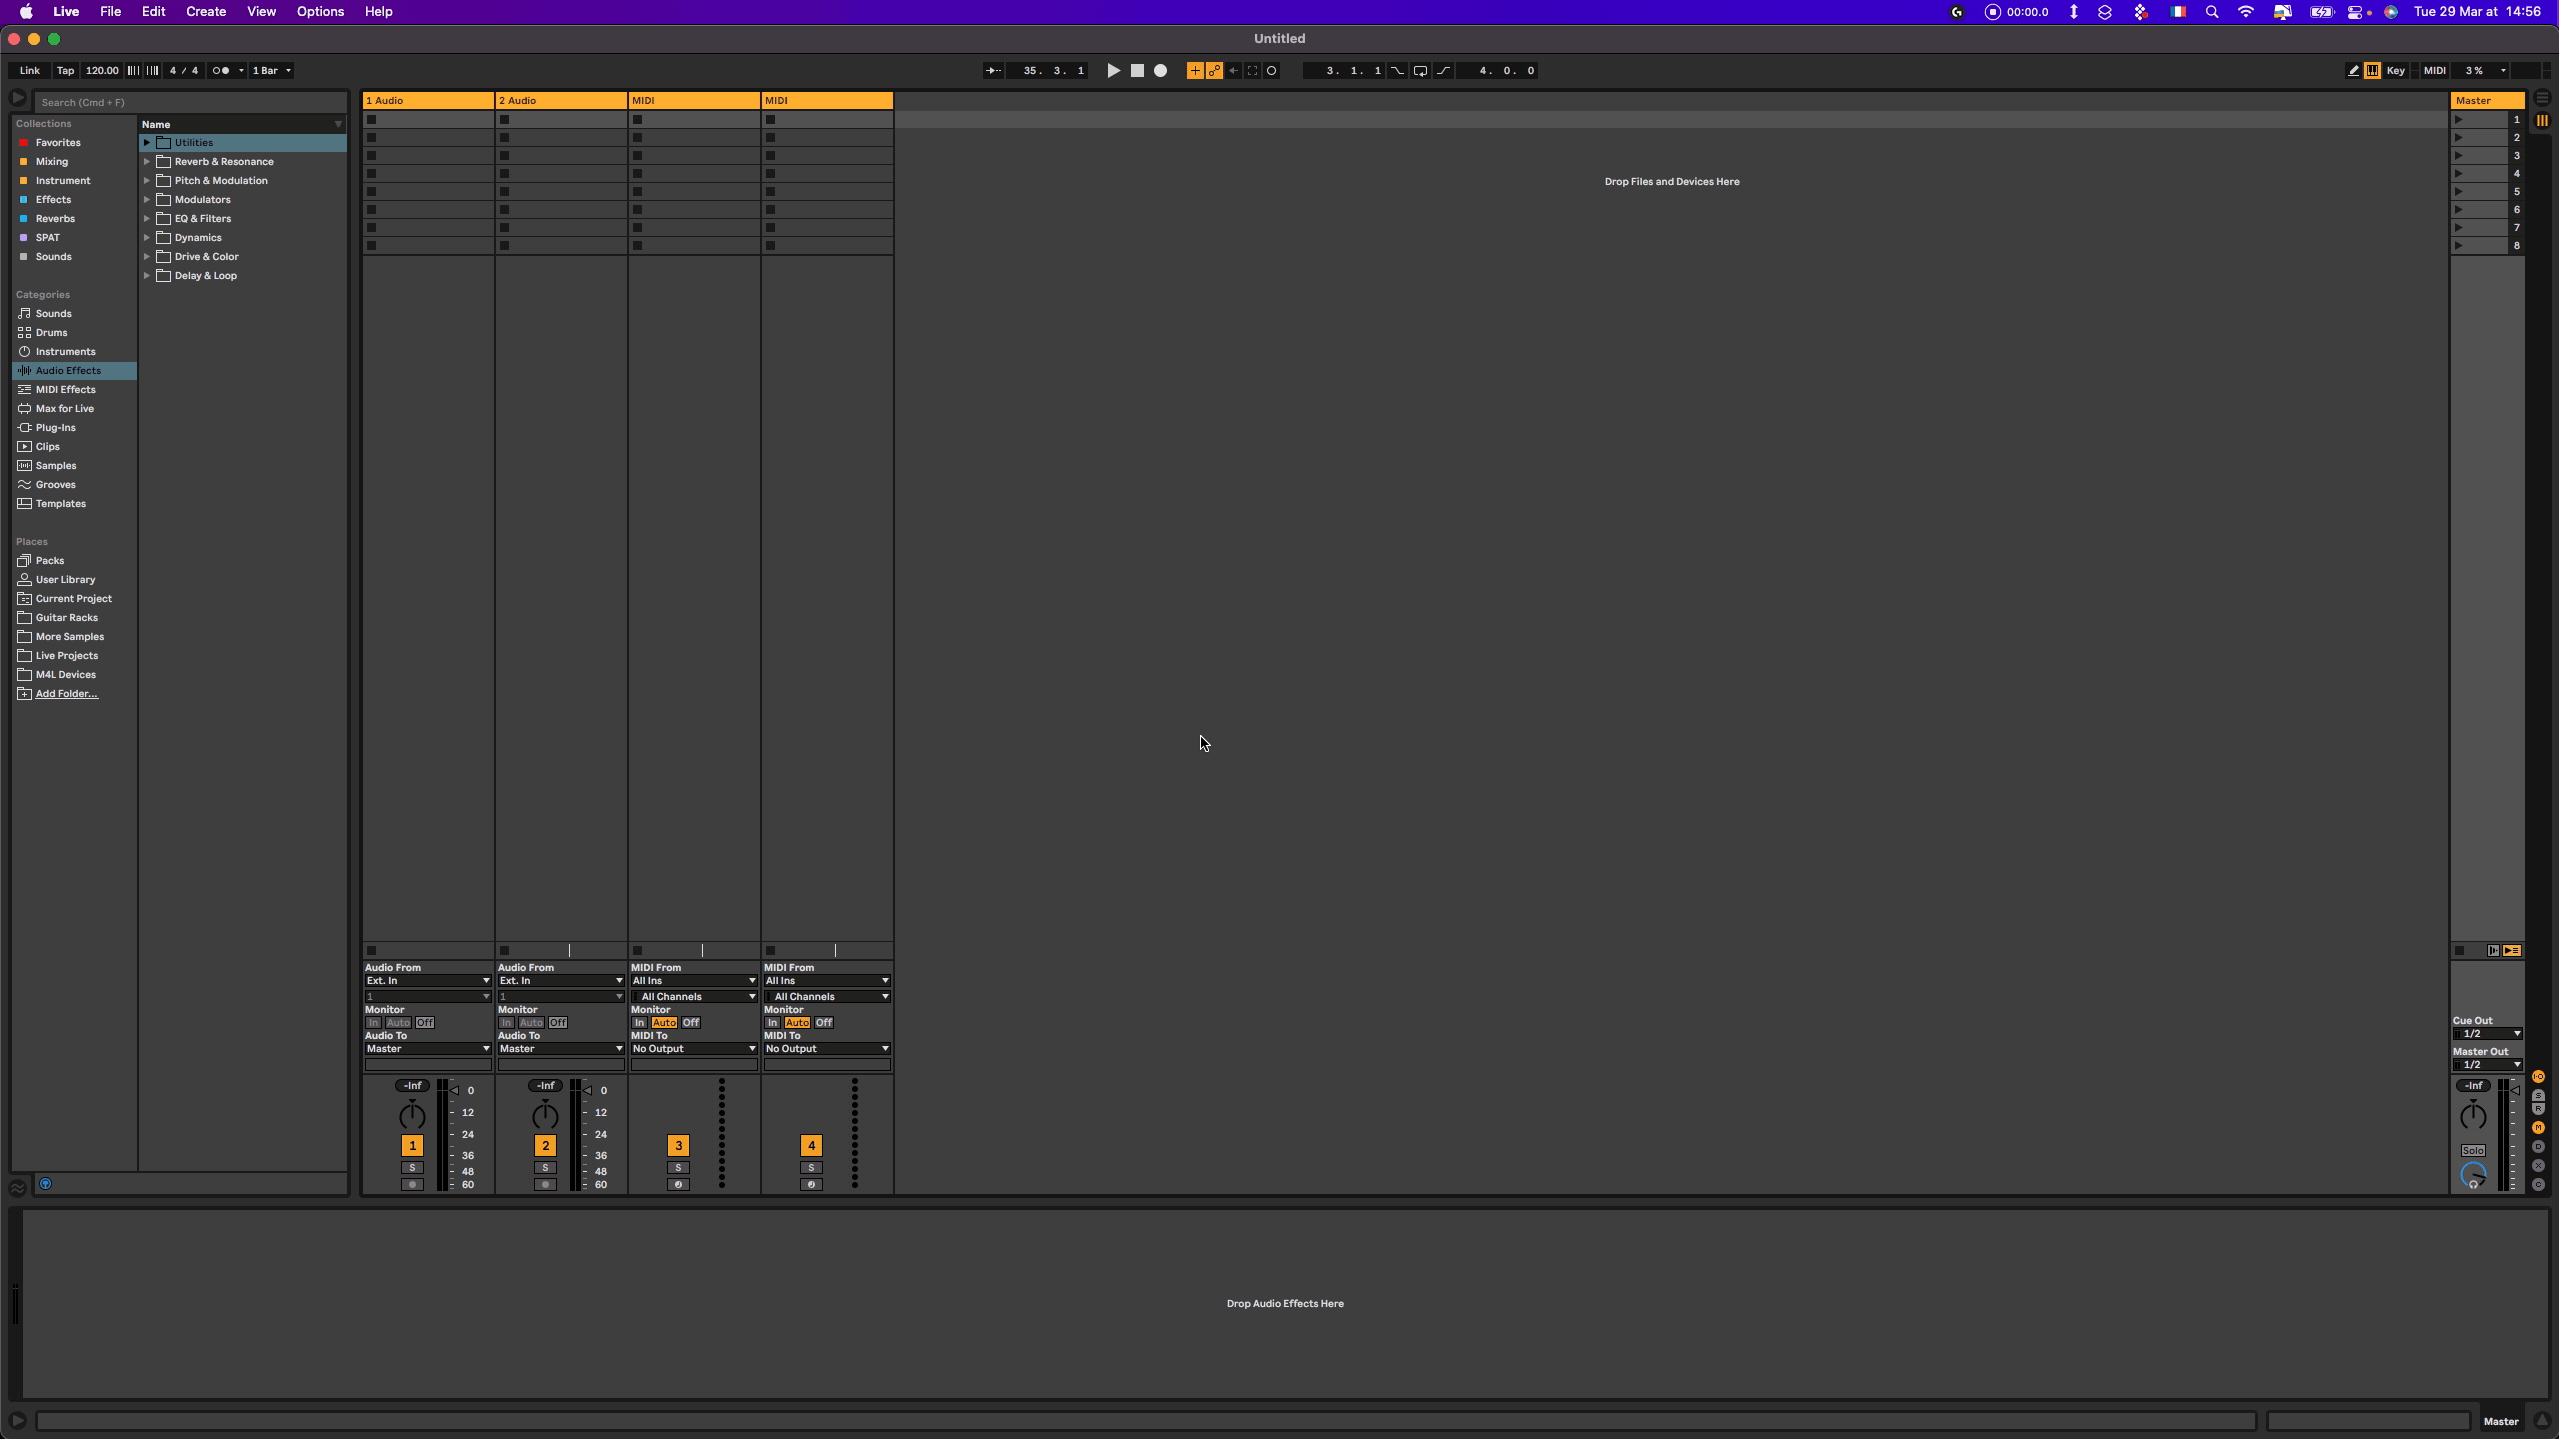
- Place on a track the devices SEND, ROOM, and RETURN located in the SPAT Folder:
The small windows popping up are the actual spat revolution plugins, on which the devices are based. They are here to host the parameters of the Sources (SEND), Room/Reverb (ROOM), and Master (RETURN) and send the automation data to SPAT Revolution using the OSC protocol.

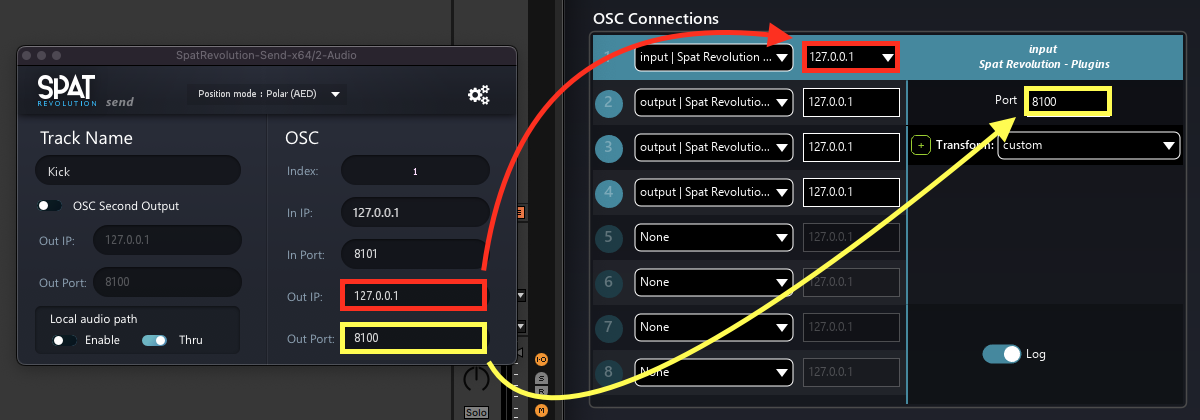
Verify that they are all set on the following:
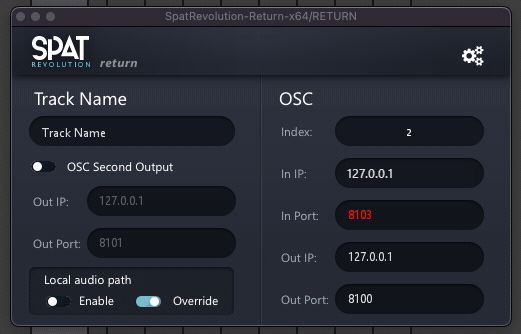
In IP: 127.0.0.1 (for all)
In Port (SEND): 8101
In Port (ROOM): 8102
In Port (RETURN): 8103
Out IP: 127.0.0.1 (for all)
Out Port: 8100 (for all)
SEND:

- ROOM:

- RETURN:

SPAT Revolution
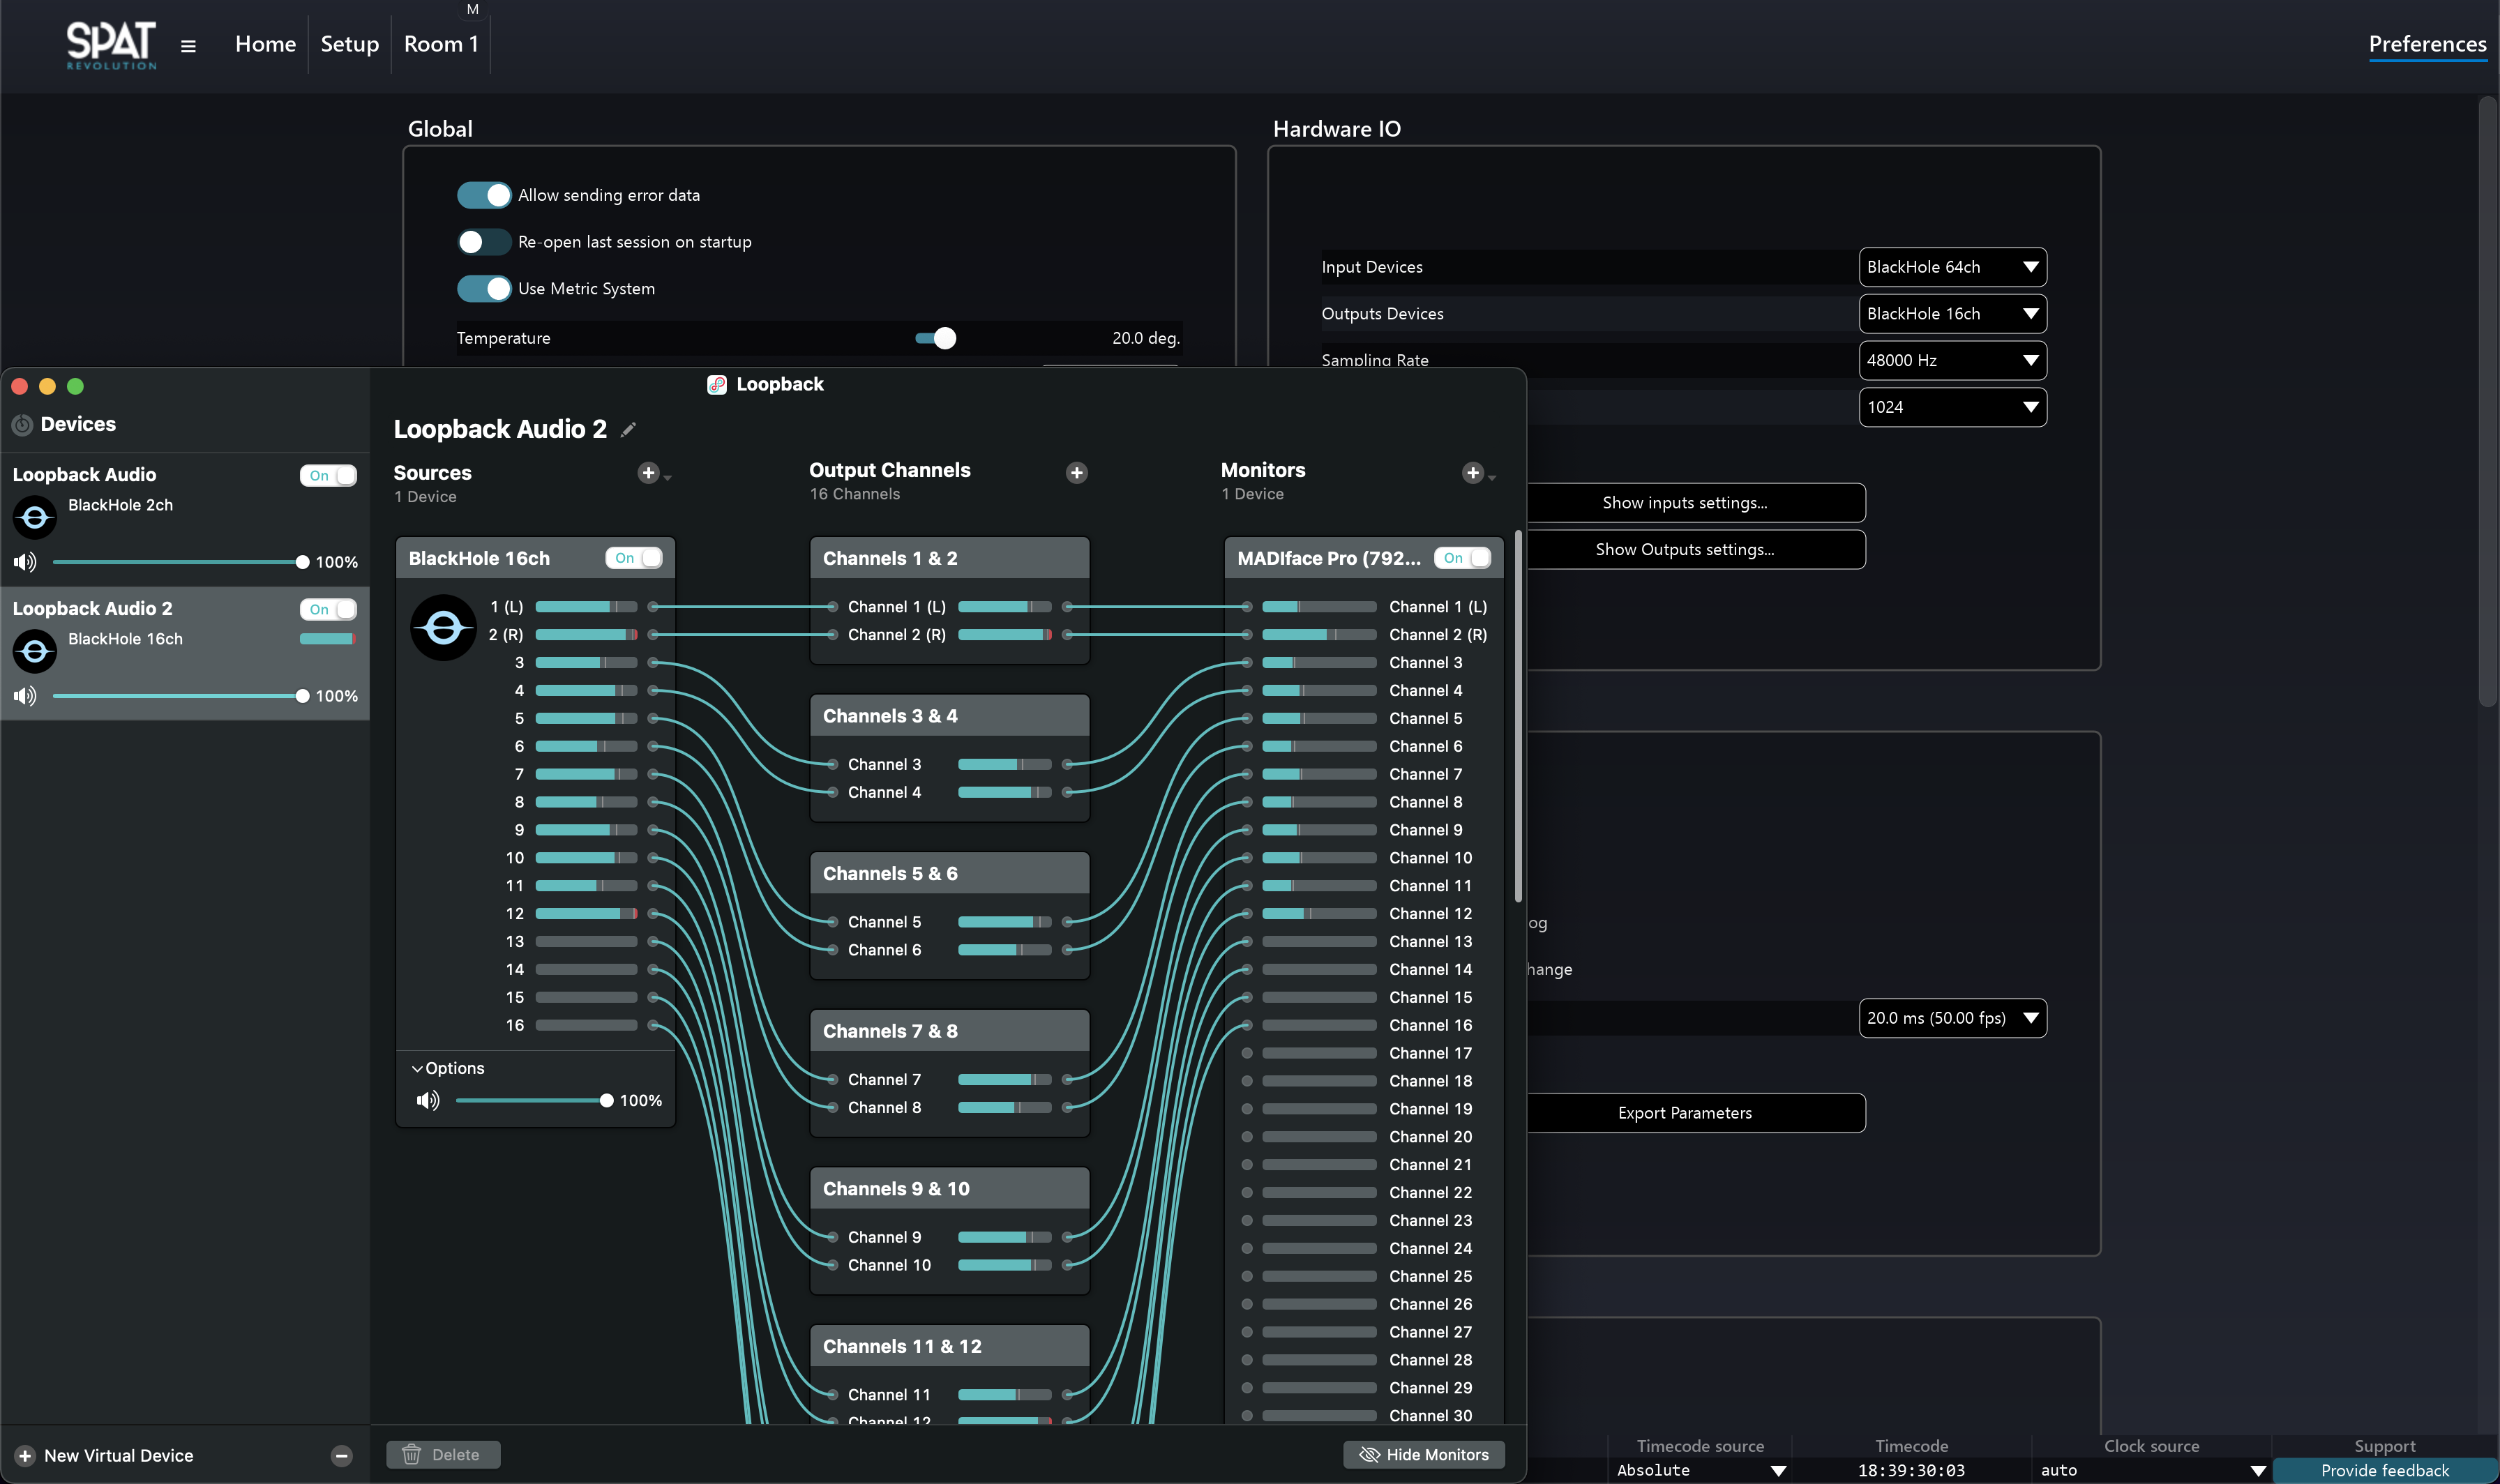
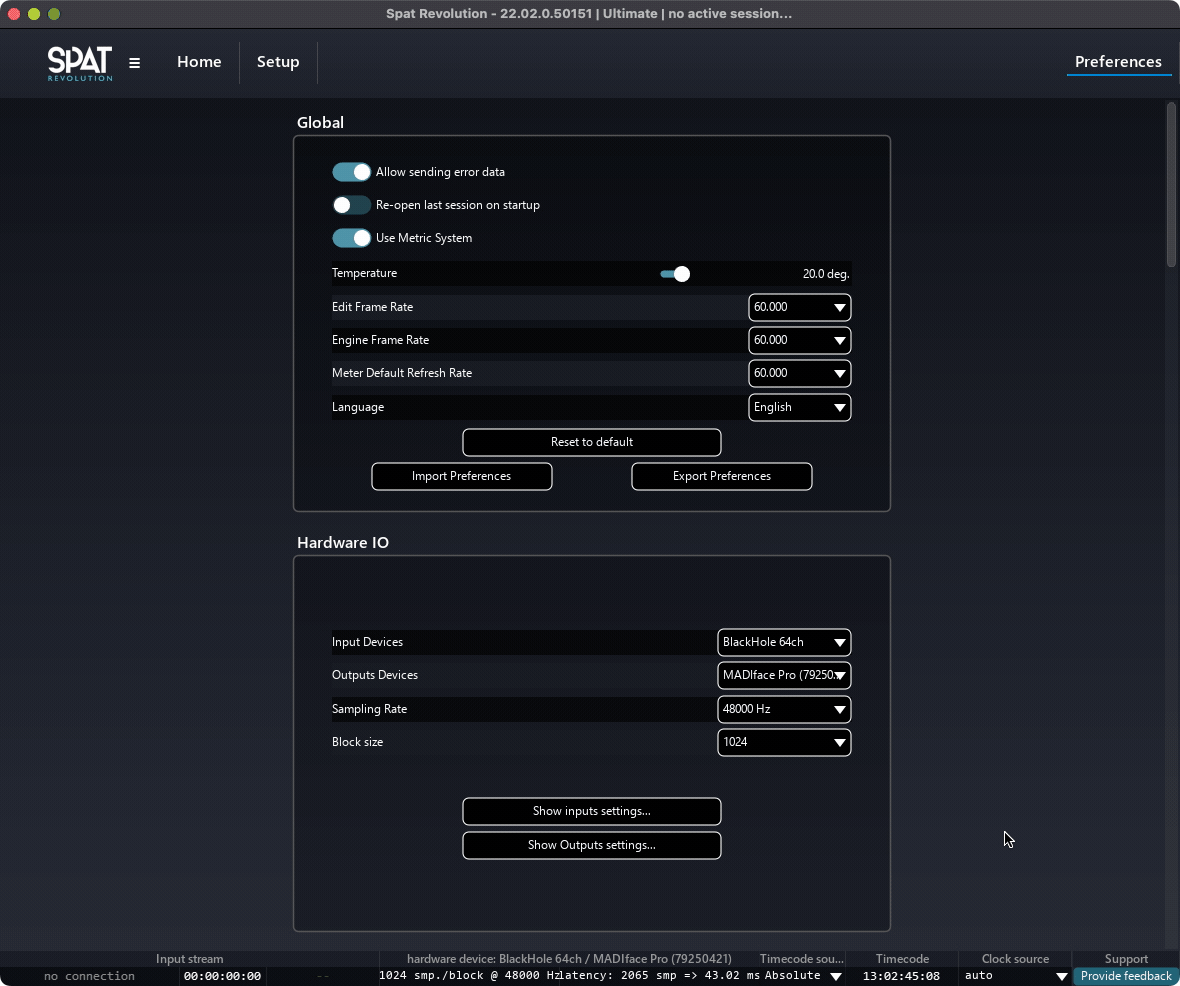
- Open SPAT Revolution and go to the Preference panel to set BlackHole as the input device and your preferred Output device:
- Activate the OSC and set up the connection (find more about OSC configuration on the OSC documentation section Introduction to Generic OSC:
What is OSC?
Open Sound Control (OSC) is a protocol for networking sound synthesizers, computers, and other multimedia devices for purposes such as musical performance or show control. OSC’s advantages include interoperability, accuracy, flexibility, and enhanced organization and documentation. The first specification was released in March 2002.
Here, we will use the OSC to send the automation information made in Live to SPAT Revolution.
Want to learn more about OSC? wikipedia.org
Devices Description
None of those devices add any latency or modification to the audio being passed through them, so do not worry about adding them anywhere in your chain!
SEND
This device lets you control some of the most valuable parameters inside SPAT for the currently selected source.
You must set up the OSC connection between Ableton Live and SPAT Revolution. The default settings of the plugins should already be set to connect with SPAT Revolution.
Please check the setup part of the guide to learn more about the OSC Connection.
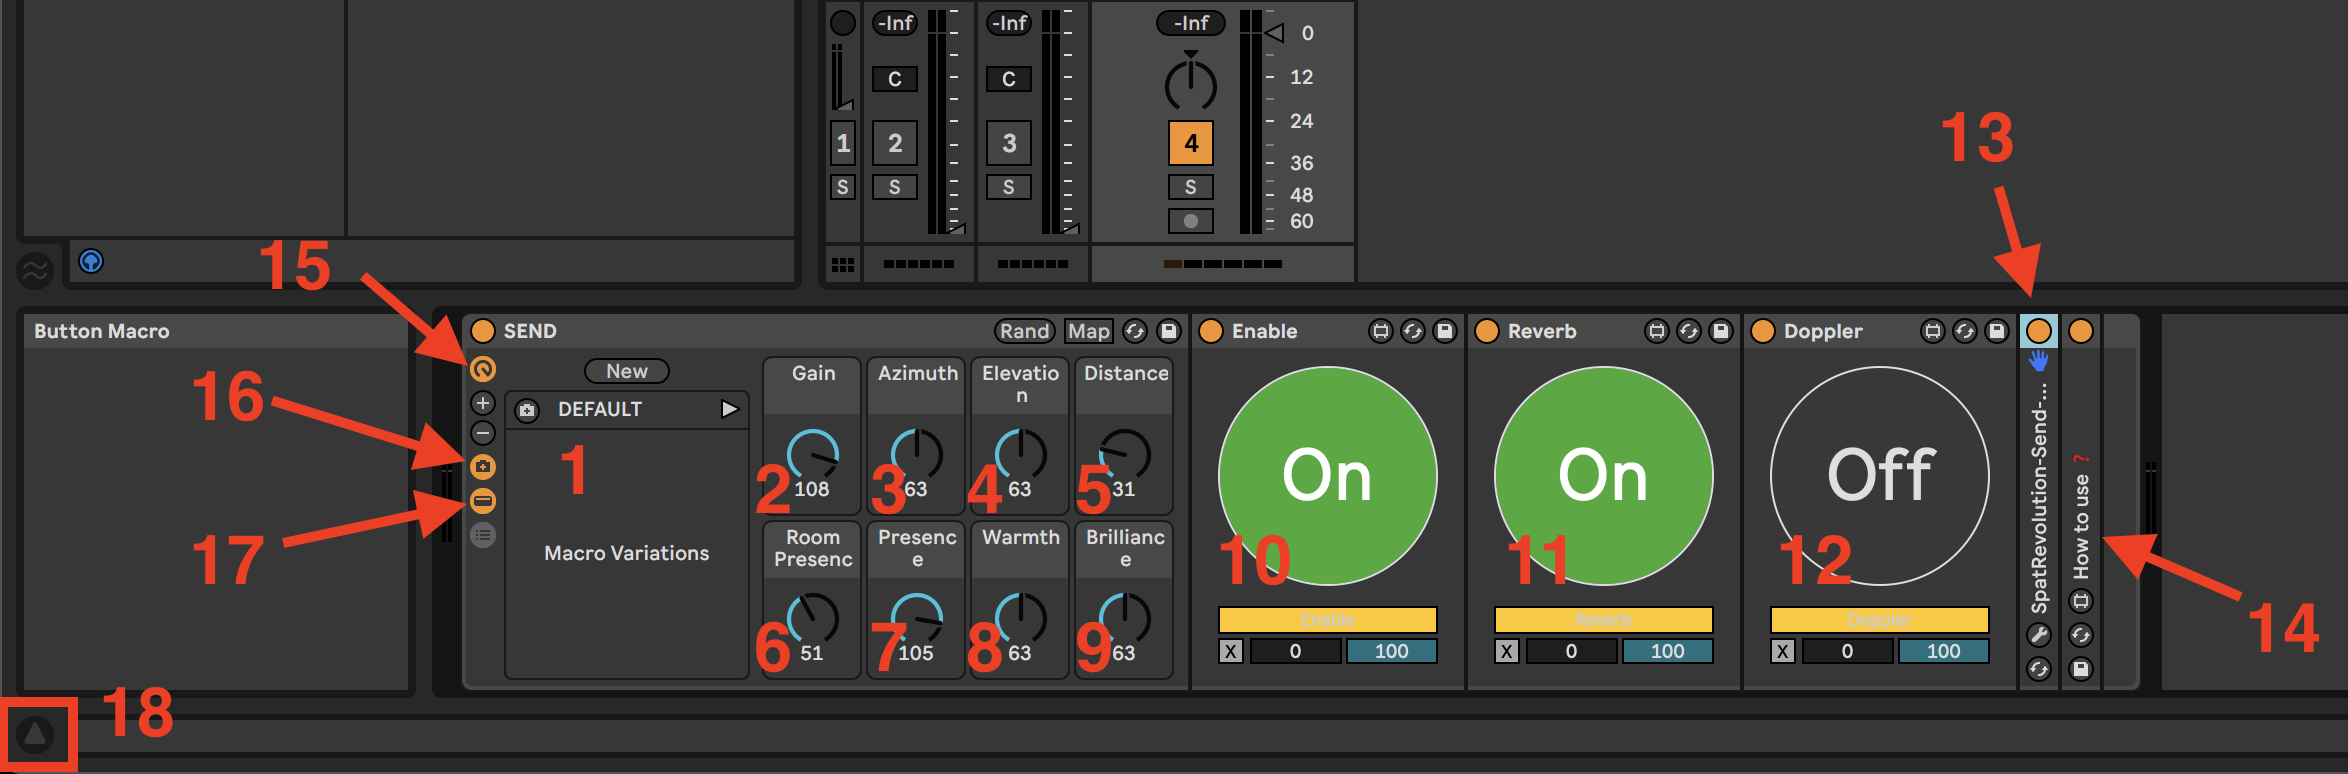
- DEFAULT: Reset the parameters of the source to the default settings.
- Gain: Configure the gain of the source.
- Azimuth: Configure the angle between the source location and the center reference point.
- Elevation: Configure the elevation angle of the source.
- Distance: Configure the distance from the source to the center reference point.
- Room Presence: Configure the prominence of the reverberation of the source.
- Presence: Configure the prominence of the direct sound.
- Warmth: Configure the presence of the low-frequency content part of the source.
- Brilliance: Configure the presence of the high-frequency content part of the source.
- Enable: Mute or unmute the currently selected sources inside SPAT Revolution.
- Reverb: Enable or disable the reverb inside SPAT Revolution for the currently selected source.
- Doppler: Activate the Doppler effect for the currently selected source.
- SpatRevolution-Send-x64: The original plugin on which the device is based, you can still access the individual parameters by un-folding the device or accessing the GUI by clicking the minor key at the bottom.
- How to use: This is a small notepad device with additional notes to prevent you from having to check back the guide if you forget something.
- Macro Controls: Click this button to hide the encoder knobs of the device (ref from n°2 to n°9)
- Macro Variation: Click this button to hide the macro variations (ref to n°1)
- Show/Hide Devices: Click this button to hide everything after the encoder knobs. (ref from n°10 to n°14)
- Info View: This opens/closes Live’s built-in text info box, every parameter in the device has text info, so this box might be useful if you need to know which does what.
Additional Information❗️
- Automations:
Note that Ableton Live takes over the automation parameters inside the DAW, so you can move the source inside SPAT Revolution without the parameter moving inside Ableton Live. To fix this simply, right-click on the parameter in question and select Remove Mapping to Send.
- Moving the device in Live:
Moving this device to another track instead of deleting and creating a new one will un-map the Enable, Reverb, and Doppler buttons. Deleting the device first is safer, and then placing a new one on the new track. It also could help you prevent any OSC Index-related issues.
Duplicating the track will result in the same issue. So you should manually place the device on each new track you create, although you can still duplicate your track (if needed) and simply delete the device and place a new one on the track.
- Undo/Redo:
Usually, in SPAT Revolution, we currently cannot do undo/redo action, but Live with this device works! As long as the action you are backtracking has been operated inside Ableton Live directly.
- SEND - LAP: (available in the Alternate Versions folder)
The LAP version is exactly the same but is programmed to activate the Local Audio Path right of the start if you prefer working with this instead of virtual audio drivers.
- SEND - Advanced: (available in the Alternate Versions folder)
A more advanced version of the original device, with simply most of the available source settings inside SPAT Revolution.
- SEND - LAP - Advanced: (available in the Alternate Versions folder)
A combo of the two versions described above, so Local Audio Path activated and more source control parameters.
ROOM
This device allows you to control the reverb quickly; many more parameters will be available if you go directly into the Reverb settings inside your Room.
You must set up the OSC connection between Ableton Live and SPAT Revolution. The default settings of the plugins should already be set to connect with the SPAT Revolution.
Please check the setup part of the guide to learn more about the OSC Connection.
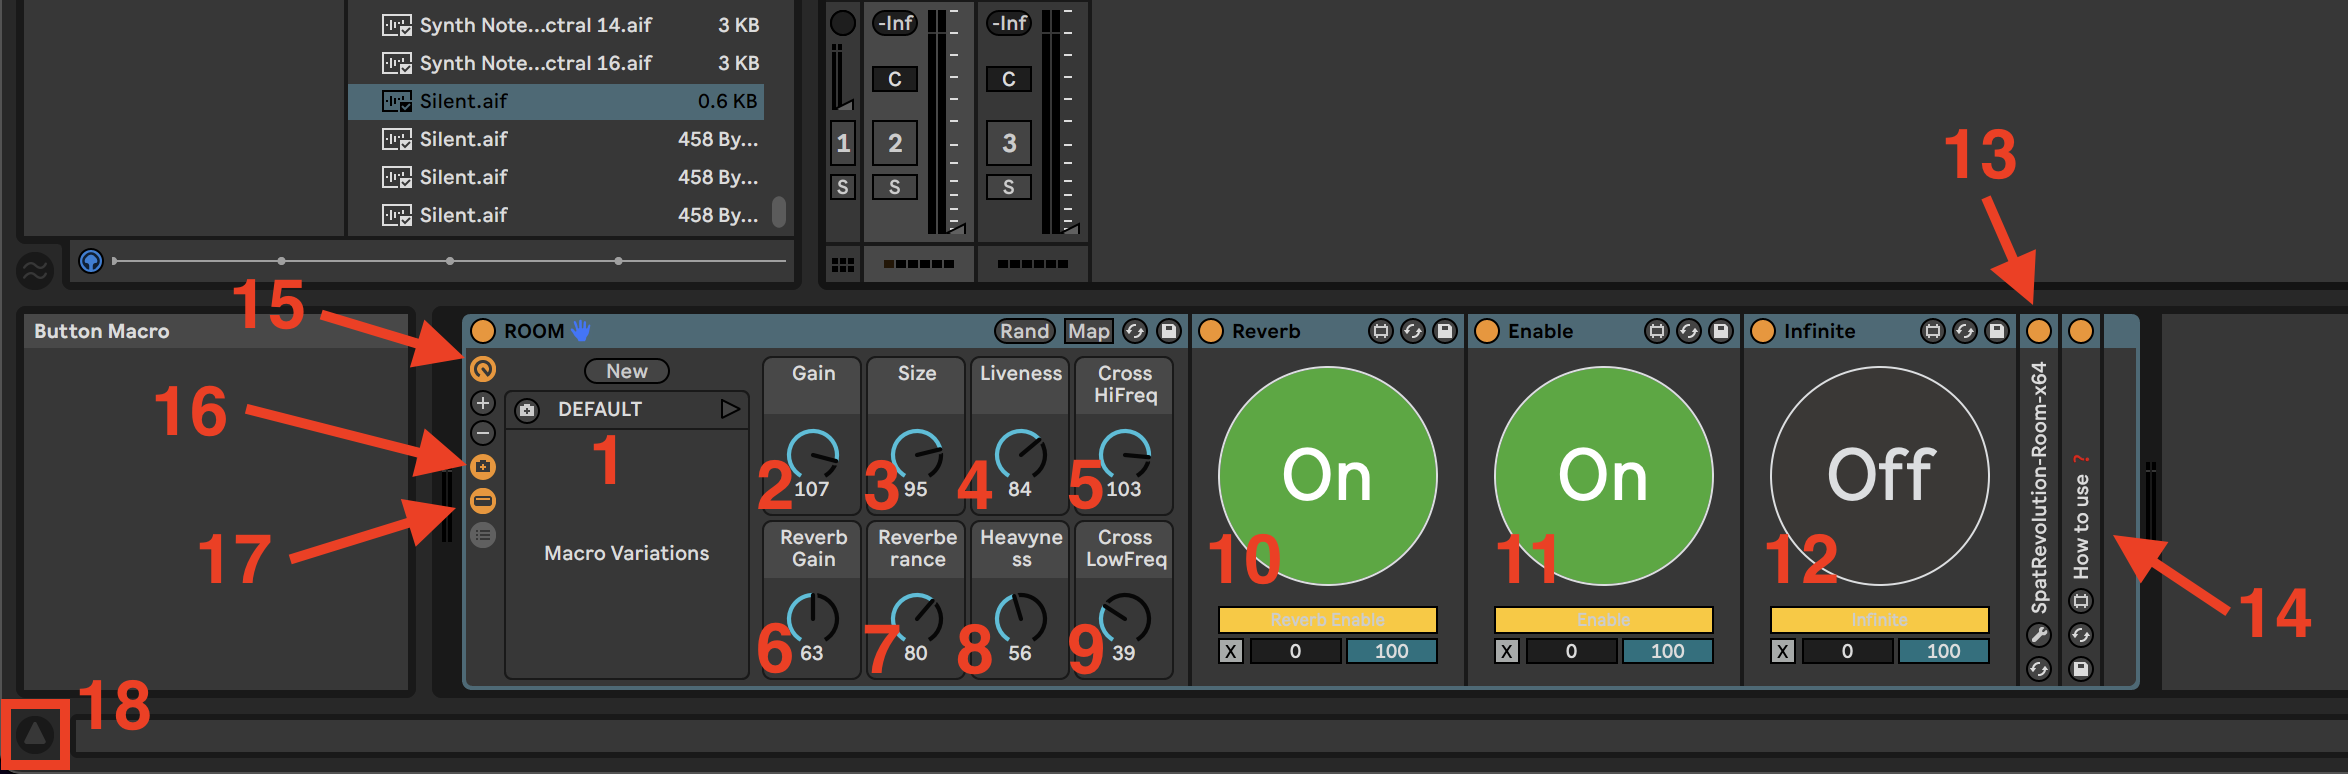
- DEFAULT: Reset the Room’s parameters to the default settings.
- Gain: Configure the gain of the room.
- Size: Change the reverb size value.
- Liveness: Configure the relative decay time of high-frequency content, relative to the reverberance.
- Cross HiFreq: Configure the frequency above which the Liveness setting determines decay time.
- Reverb Gain: Configure the reverb gain.
- Reverberance: Change the reverberance value.
- Heavyness: Configure the relative decay time of low-frequency content, relative to the reverberance.
- Cross LowFreq: Configure the presence of the high-frequency content part of the source.
- Reverb: Completely disable the reverb for the currently selected Room.
- Enable: Mute or unmute the currently selected room.
- Infinite: Toggle the infinite more of the reverb, be careful with your gain when using this one.
- SpatRevolution-Room-x64: The original plugin on which the device is based, you can still access the individual parameters by un-folding the device or accessing the GUI by clicking the small key at the bottom.
- How to use: This is a small notepad device with additional notes to prevent you from having to check back the guide if you forget something.
- Macro Controls: Click this button to hide the encoder knobs of the device (ref from n°2 to n°9)
- Macro Variation: Click this button to hide the macro variations (ref to n°1)
- Show/Hide Devices: Click this button to hide everything after the encoder knobs. (ref from n°10 to n°14)
- Info View: This opens/closes Live’s built-in text info box; every parameter in the device has text info, so this box might be useful if you need to know which does what.
Additional Information❗️
- Automations:
Note that Live takes over the automation parameters inside the DAW, so you can move the source inside SPAT Revolution and without the parameter moving inside Ableton Live. To fix this, simply right-click the parameter in question and select Remove Mapping to Send.
- Moving the device in Live:
Moving this device to another track instead of deleting and creating a new one will un-map the Enable, Reverb, and Infinite buttons. Deleting the device first is safer, and then placing a new one on the new track. It also could help you prevent any OSC Index-related issues.
Duplicating the track will result in the same issue. So, if you have more than one Room, you should manually create a new track and place the ROOM device.
- Undo/Redo:
Usually, in SPAT Revolution, we currently cannot do undo/redo action, but in Live with this device it does work! As long as the action you are backtracking has been operated inside Ableton Live directly.
- ROOM - Advanced: (available in the Alternate Versions folder)
A more advanced version of the original device, with simply most of the available reverb settings inside SPAT Revolution.
RETURN
This device allows you to control the gain of the selected Master. You can find this block between the Room and the final output.
You must set up the OSC connection between Ableton Live and SPAT Revolution. The default settings of the plugins should already be set to connect with the SPAT Revolution.
Please check the setup part of the guide to learn more about the OSC Connection.
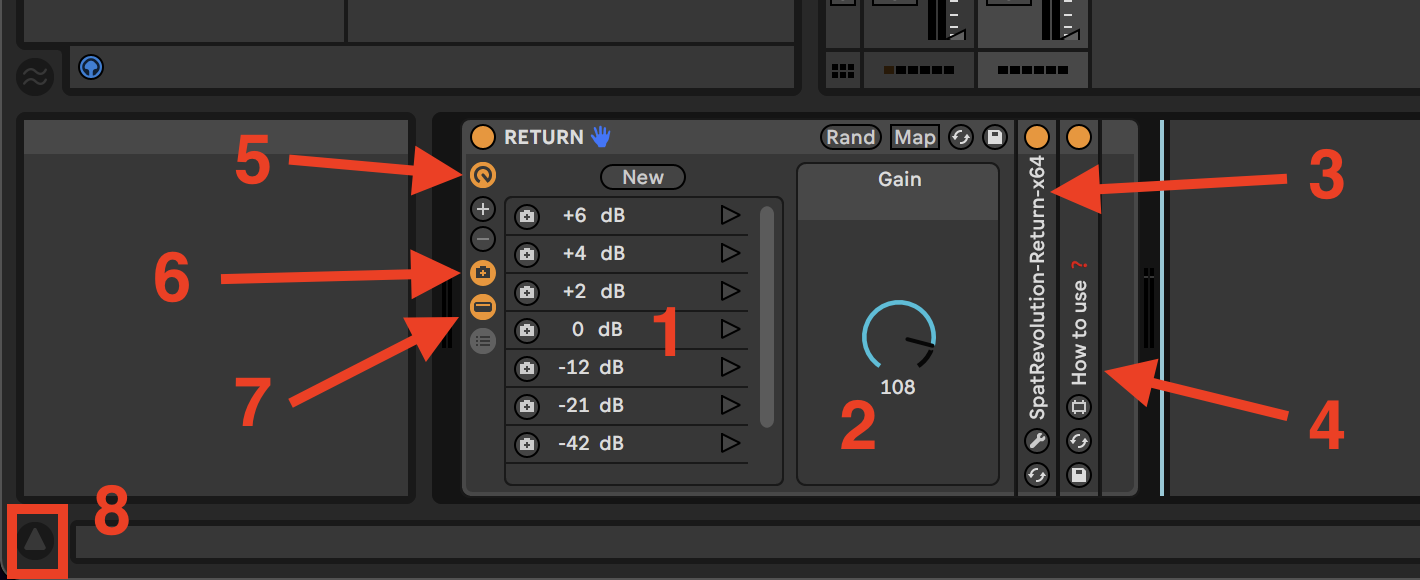
- Macro Variations: Quick shortcuts to jump to specific values instead of using the encoder knob.
- Gain: Set the gain of the currently selected Master.
- SpatRevolution-Return-x64: The original plugin on which the device is based, you can still access the individual parameters by un-folding the device or accessing the GUI by clicking the small key at the bottom.
- How to use: This is a small notepad device with additional notes to prevent you from having to check back the guide if you forget something.
- Macro Controls: Click this button to hide the encoder knobs of the device (ref to n°2)
- Macro Variation: Click this button to hide the macro variations (ref to n°1)
- Show/Hide Devices: Click this button to hide everything after the encoder knobs. (ref from n°3 and n°4)
- Info View: This opens/closes Live’s built-in text info box; every parameter in the device has text info, so this box might be useful if you need to know which does what.
Additional Information❗️
- Automation:
Note that Live takes over the automation parameters inside the DAW, so you can move the source inside SPAT and without the parameter moving inside Ableton Live. To fix this, simply right-click the parameter in question and select Remove Mapping to Send
- Moving the device in Live:
Unlike the Send and Room devices, which have specific M4L devices that can’t be moved from one track to another without being unfortunately un-mapped, you can easily move this device around without any issues.
And again, unlike the two previously mentioned devices with the return, if you have more than one Master in your SPAT Revolution session, you can easily duplicate the track hosting the RETURN device, and it will automatically set up everything correctly.
- Undo/Redo:
Usually, in SPAT Revolution, we currently cannot do undo/redo action, but in Live with this device, it does work! As long as the action you are backtracking has been operated inside Ableton Live directly.
“Don’t forget to rename your tracks for an easier read of your session!”
Automator
The Automator device allows you to make the selected source move around in SPAT Revolution in a more organic and continuous way compared to traditional automation.
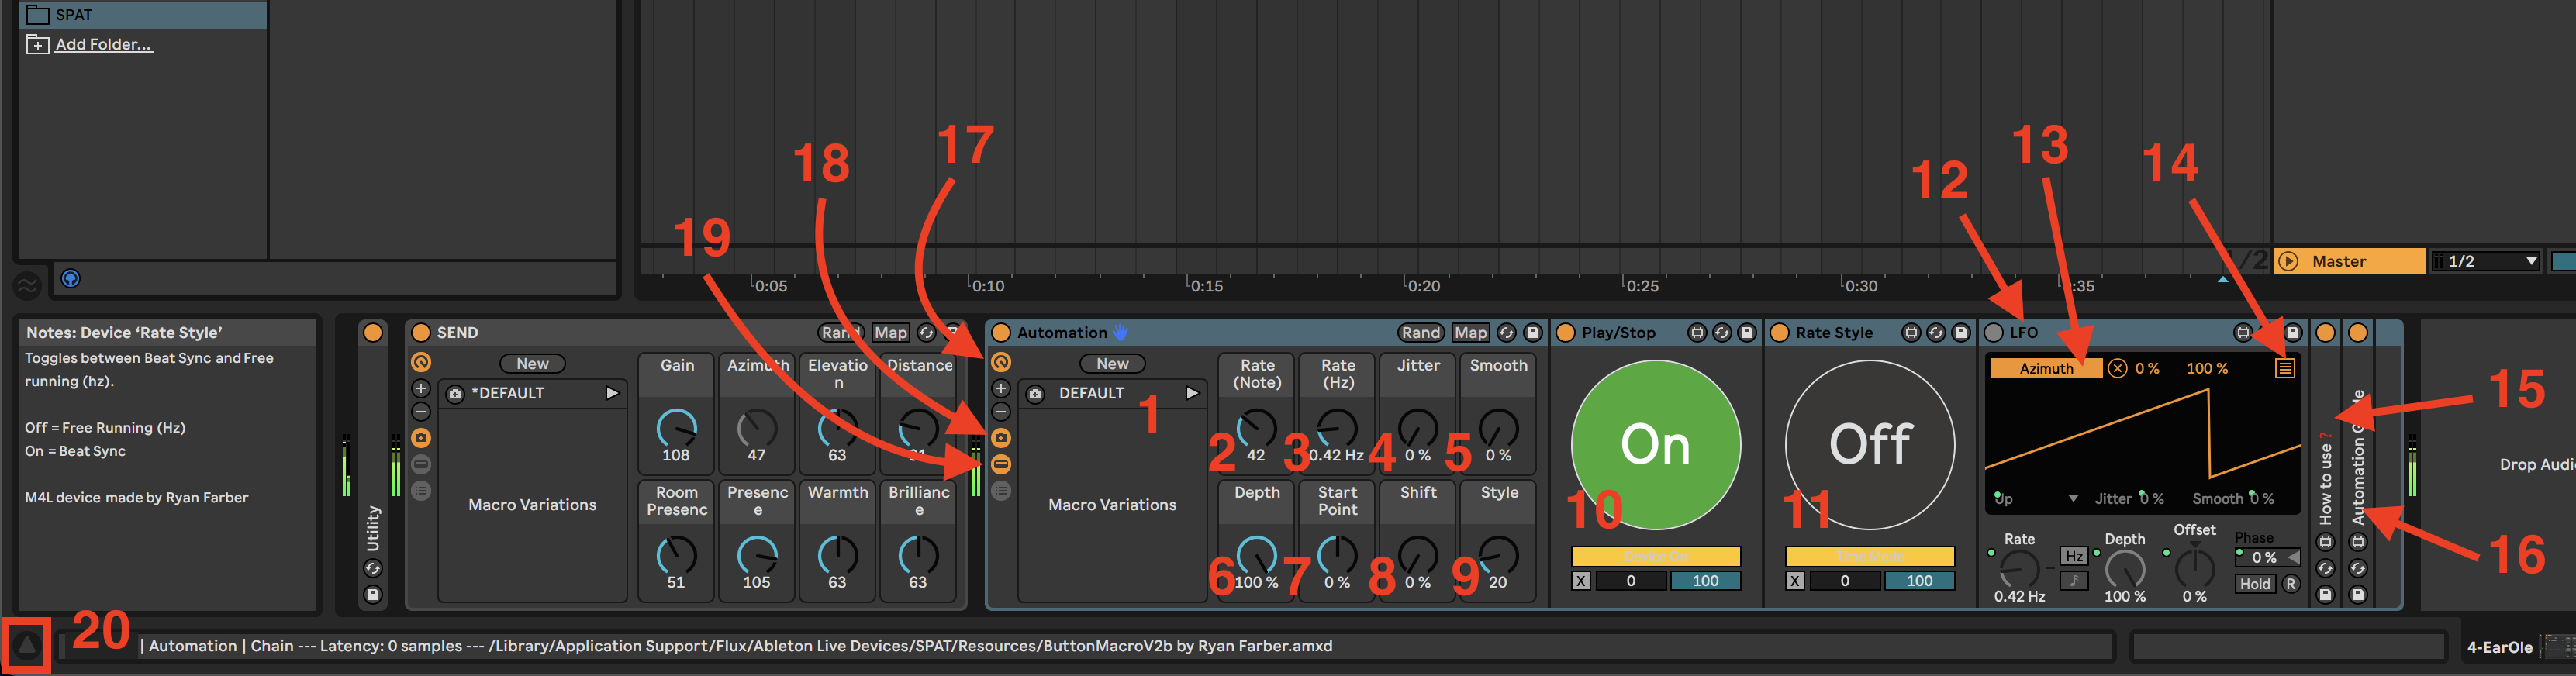
- Macro Variations: Quick shortcuts to reset to the device’s default parameters, you can create new macros to change the automation of a source quickly.
- Rate (Note): The base rate of the automation (expressed in note values).
- Rate (Hz): The base rate of the automation (expressed in hz).
- Jitter: Introduces some jitter in the automation signal.
- Smooth: Smooth value changes (and jitter, as well).
- Depth: Depth of the LFO automation.
- Start Point: Shift the start point of the automation.
- Shift: This allows you to shift the placement of the automation relative to other LFOs in Live (requires restarting the session to get all the LFO synced together).
- Style: Change the automation style (Sine, Saw, Square, etc.).
- Play/Stop: Play or stop the automation.
- Rate Style: Toggles between Beat Sync and Free running (Hz).
- LFO: The LFO generates automation on the primary SEND device; click the Map button, and then select the Azimuth parameter.
- Map: Click this button to activate the Map Mode; you can then click the parameter in the SEND device that you wish to automate.
- Multimap: This is the Multimap browser; it can allow you to map the same automation to multiple parameters. You can then tweak each one separately using the Min/Max percentage.
- How to use: This is a small notepad device with additional notes to prevent you from having to check back the guide if you forget something.
- Automator Guide: Same as the “How to use”, this one contains specific information about the different types of automation you can generate with the different LFO shapes.
- Macro Controls: Click this button to hide the encoder knobs of the device (ref from n°2 to n°9)
- Macro Variation: Click this button to hide the macro variations (ref to n°1)
- Show/Hide Devices: Click this button to hide everything after the encoder knobs. (ref from n°10 to n°16)
- Info View: This opens/closes Live’s built-in text info box; every parameter in the device has text info, so this box might be useful if you need to know which does what.
Additional Information❗️
- Moving the device in Live:
Moving this device to another track instead of deleting and creating a new one will un-map the Play/Stop and Rate Style buttons, it is safer to delete the device first and then place a new one on the new track.
Workflow
Watching the corresponding video is highly recommended for this part.
Now that we are entirely setup, the formula is straightforward:
- Optional Step: Use the
SPAT MODE ONshortcut to turn off your external connections - Open Live and select the “SPAT” folder in the Sidebar of Ableton Live
- Open the “SPAT Default.als” Template
- Open SPAT Revolution and load the Template “SPAT Default.json” from the same archive
If you have lost the location of the archive, it’s here: /Library/Application Support/Flux/Ableton Live Devices/SPAT/Templates
With both templates open, you will have a direct connection between Ableton Live’s output and your physical output so that you can start making music without thinking about spatialization in the first place.
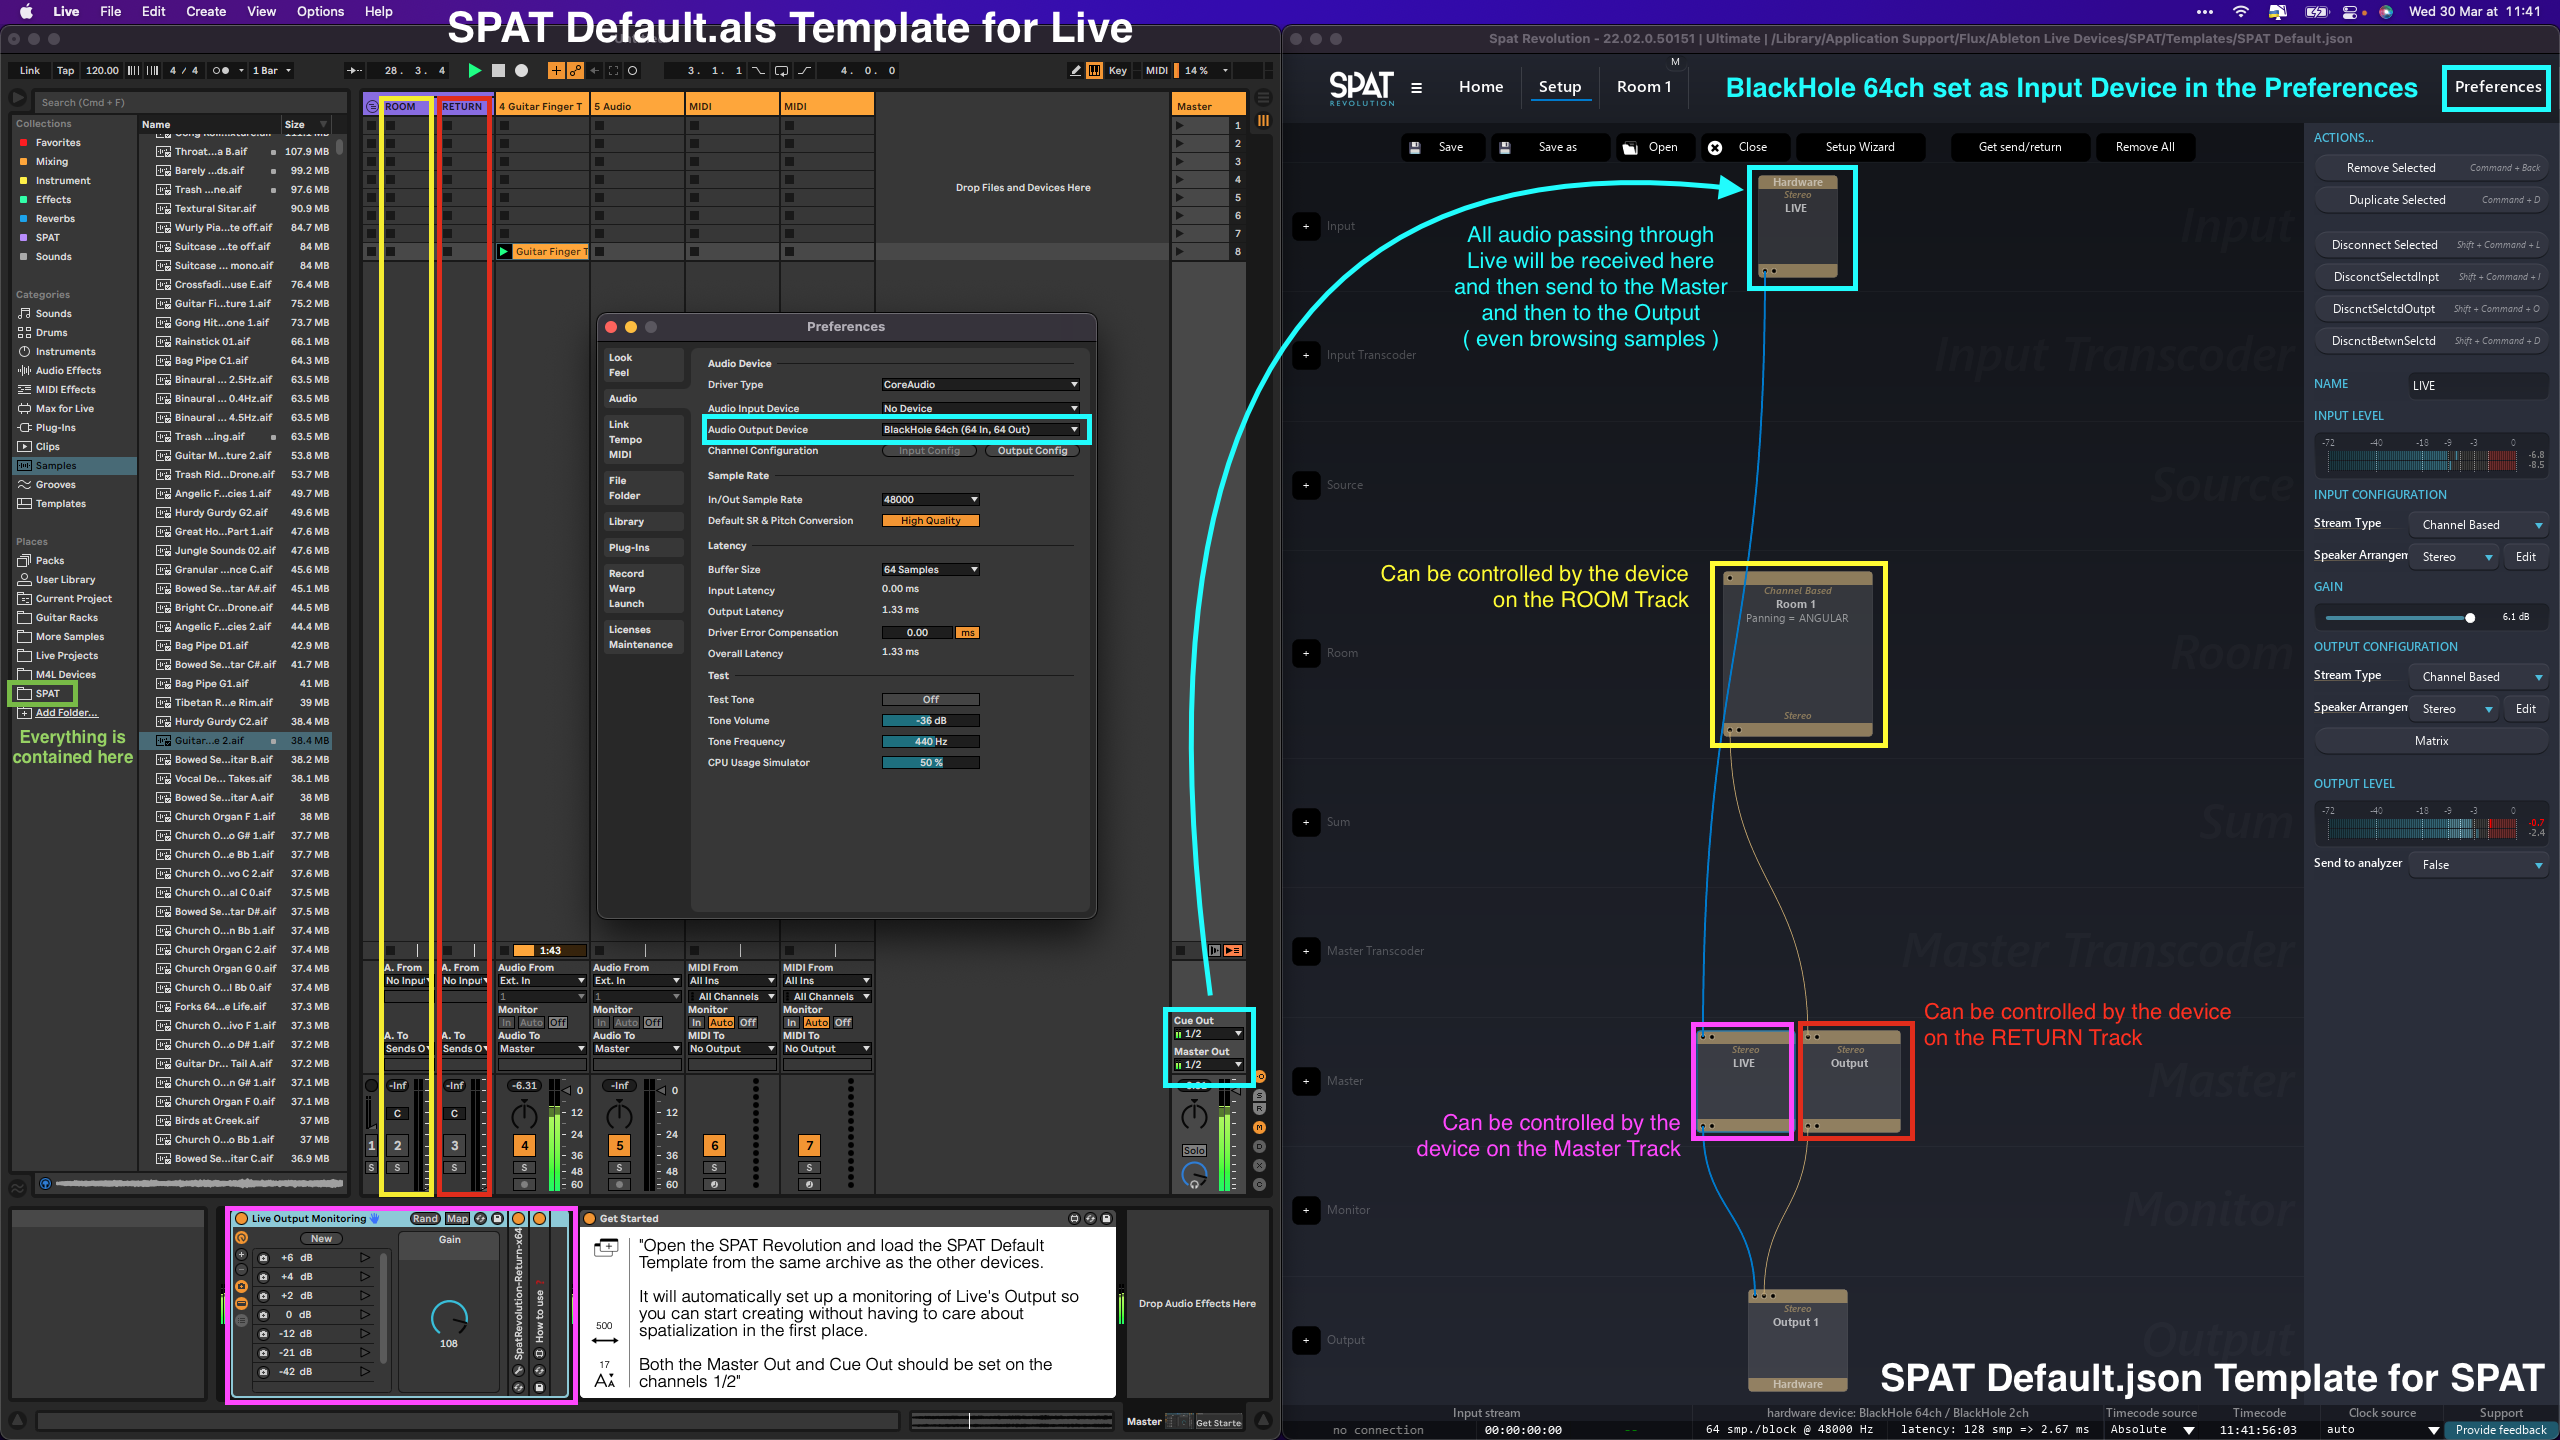
make sure your “Cue Out” and “Master Out” are both set to 1/2, that your Output device in Live is “BlackHole 64ch” and that your Input device in SPAT Revolution is “BlackHole 64ch” as well, and the device controlling the output Level of Live directly is placed on the Master Track in Live
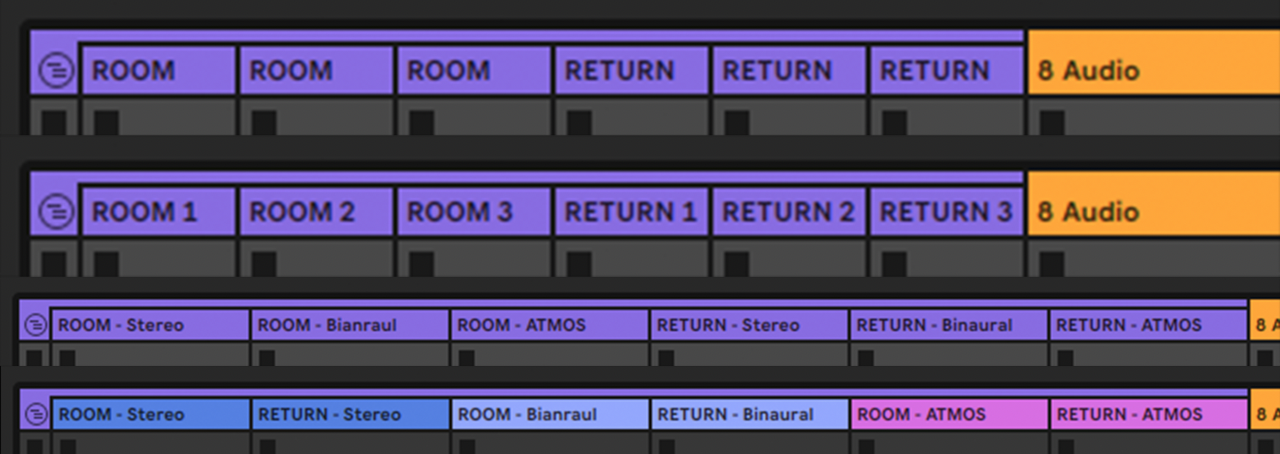
You can also note that the Ableton Live Template will set up a small group call “SPAT CTRL” which already contains a ROOM device and RETURN device, each on individual tracks for better visibility.
The ROOM device controls the room gain and reverb, and the RETURN controls the master volume.
- You can change the space you are working with by changing the reverb using the device on the ROOM track inside Ableton Live and by clicking
Reverbon the Room page of SPAT Revolution.
⚠️ This will change the virtual space sonority but not what your actual output is; you can change your speaker arrangement or stream type by going back to the setup page, selecting the Room block, and you will have the option to change the Stream Type, Speaker Arrangement (you can make or re-create your own), and the Panning Type used.
- Now, once you want to convert a track to an object in SPAT Revolution, start by attributing a channel to the track in Ableton Live.
Depending on which type of sound you are going to spatialize, you have the choice between Stereo Tracks and Mono Tracks. We would, for example, attribute a Kick to a single channel as we want to keep it Mono, a pad to a stereo, and so on. Note that by default, an input block in SPAT is Mono
- Then go back to the SPAT Revolution Setup page and add an Input Block
- select the same channel(s) you just attributed in Live and connect it to your Room
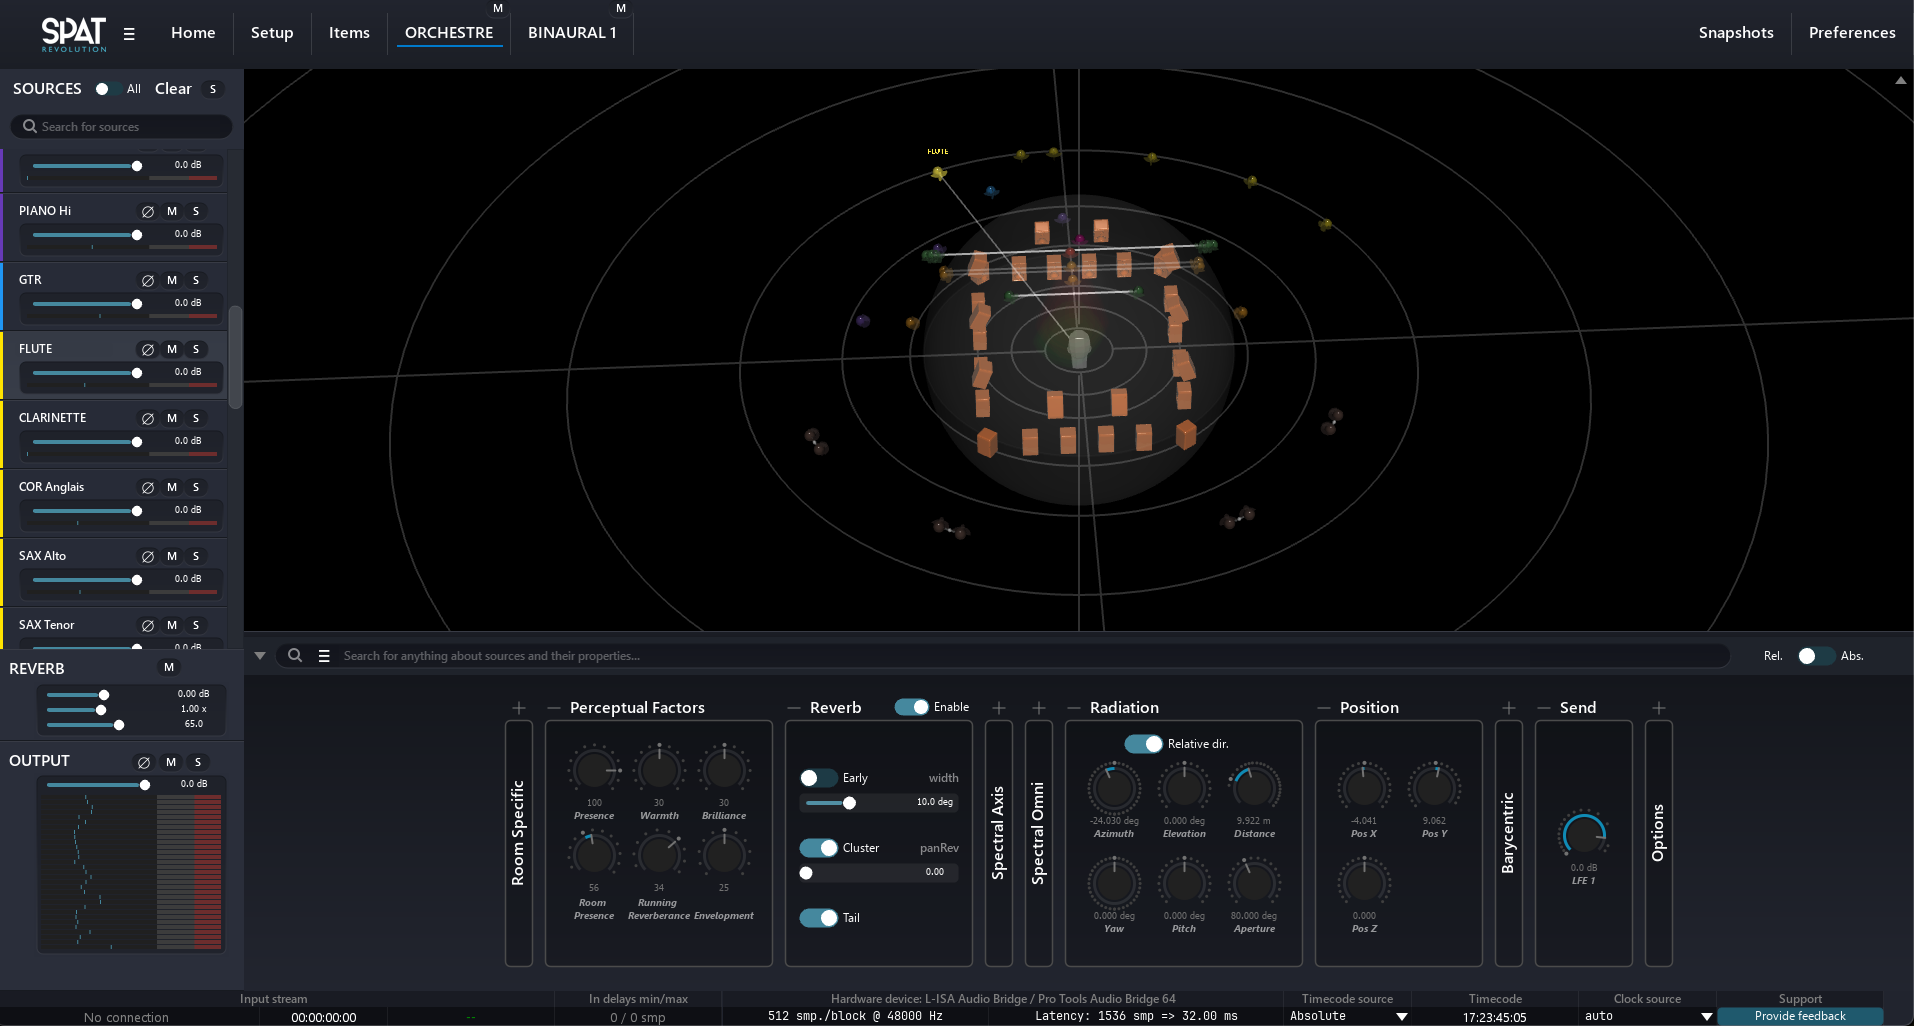
- Now you can go to the Room page and see your object in the 3D view of SPAT Revolution
- From there, you can double-click the Source and Start playing with the parameters that appear before you.
You can also click the ball in the 3D view and move it around in the Space
- You can also add the “SEND” device from our “SPAT” folder in the sidebar of Live to Control the source directly from the DAW.
When adding a “SEND” device to your track, the UI of the original send plugin will open. You can take the time to rename the track in the plugin before closing the GUI so that the name translates automatically into SPAT Revolution.
- You can also start automating it using traditional automation or the “Automator” device in the same folder as the other devices.
direct link if not loading: https://youtu.be/xarMJBSSwU0
Happy Immersive Creating!
Printing an Immersive Mix
This part is also available as a YouTube Video
Now comes the time to think about how to render what we made inside Ableton Live and SPAT Revolution.
There are a few strategies about this, which have multiple solutions, and a few factors to consider like the number of Room, Return, Channels, etc…
But the absolute main thing we cannot avoid is that we need to render real-time everything we made.
Let’s have a use case to demonstrate how you can print our mix.
Here is a session that we will render for the Binaural (3d on headphones) Version and, at the same time, generate a Bed for an Atmos render later.
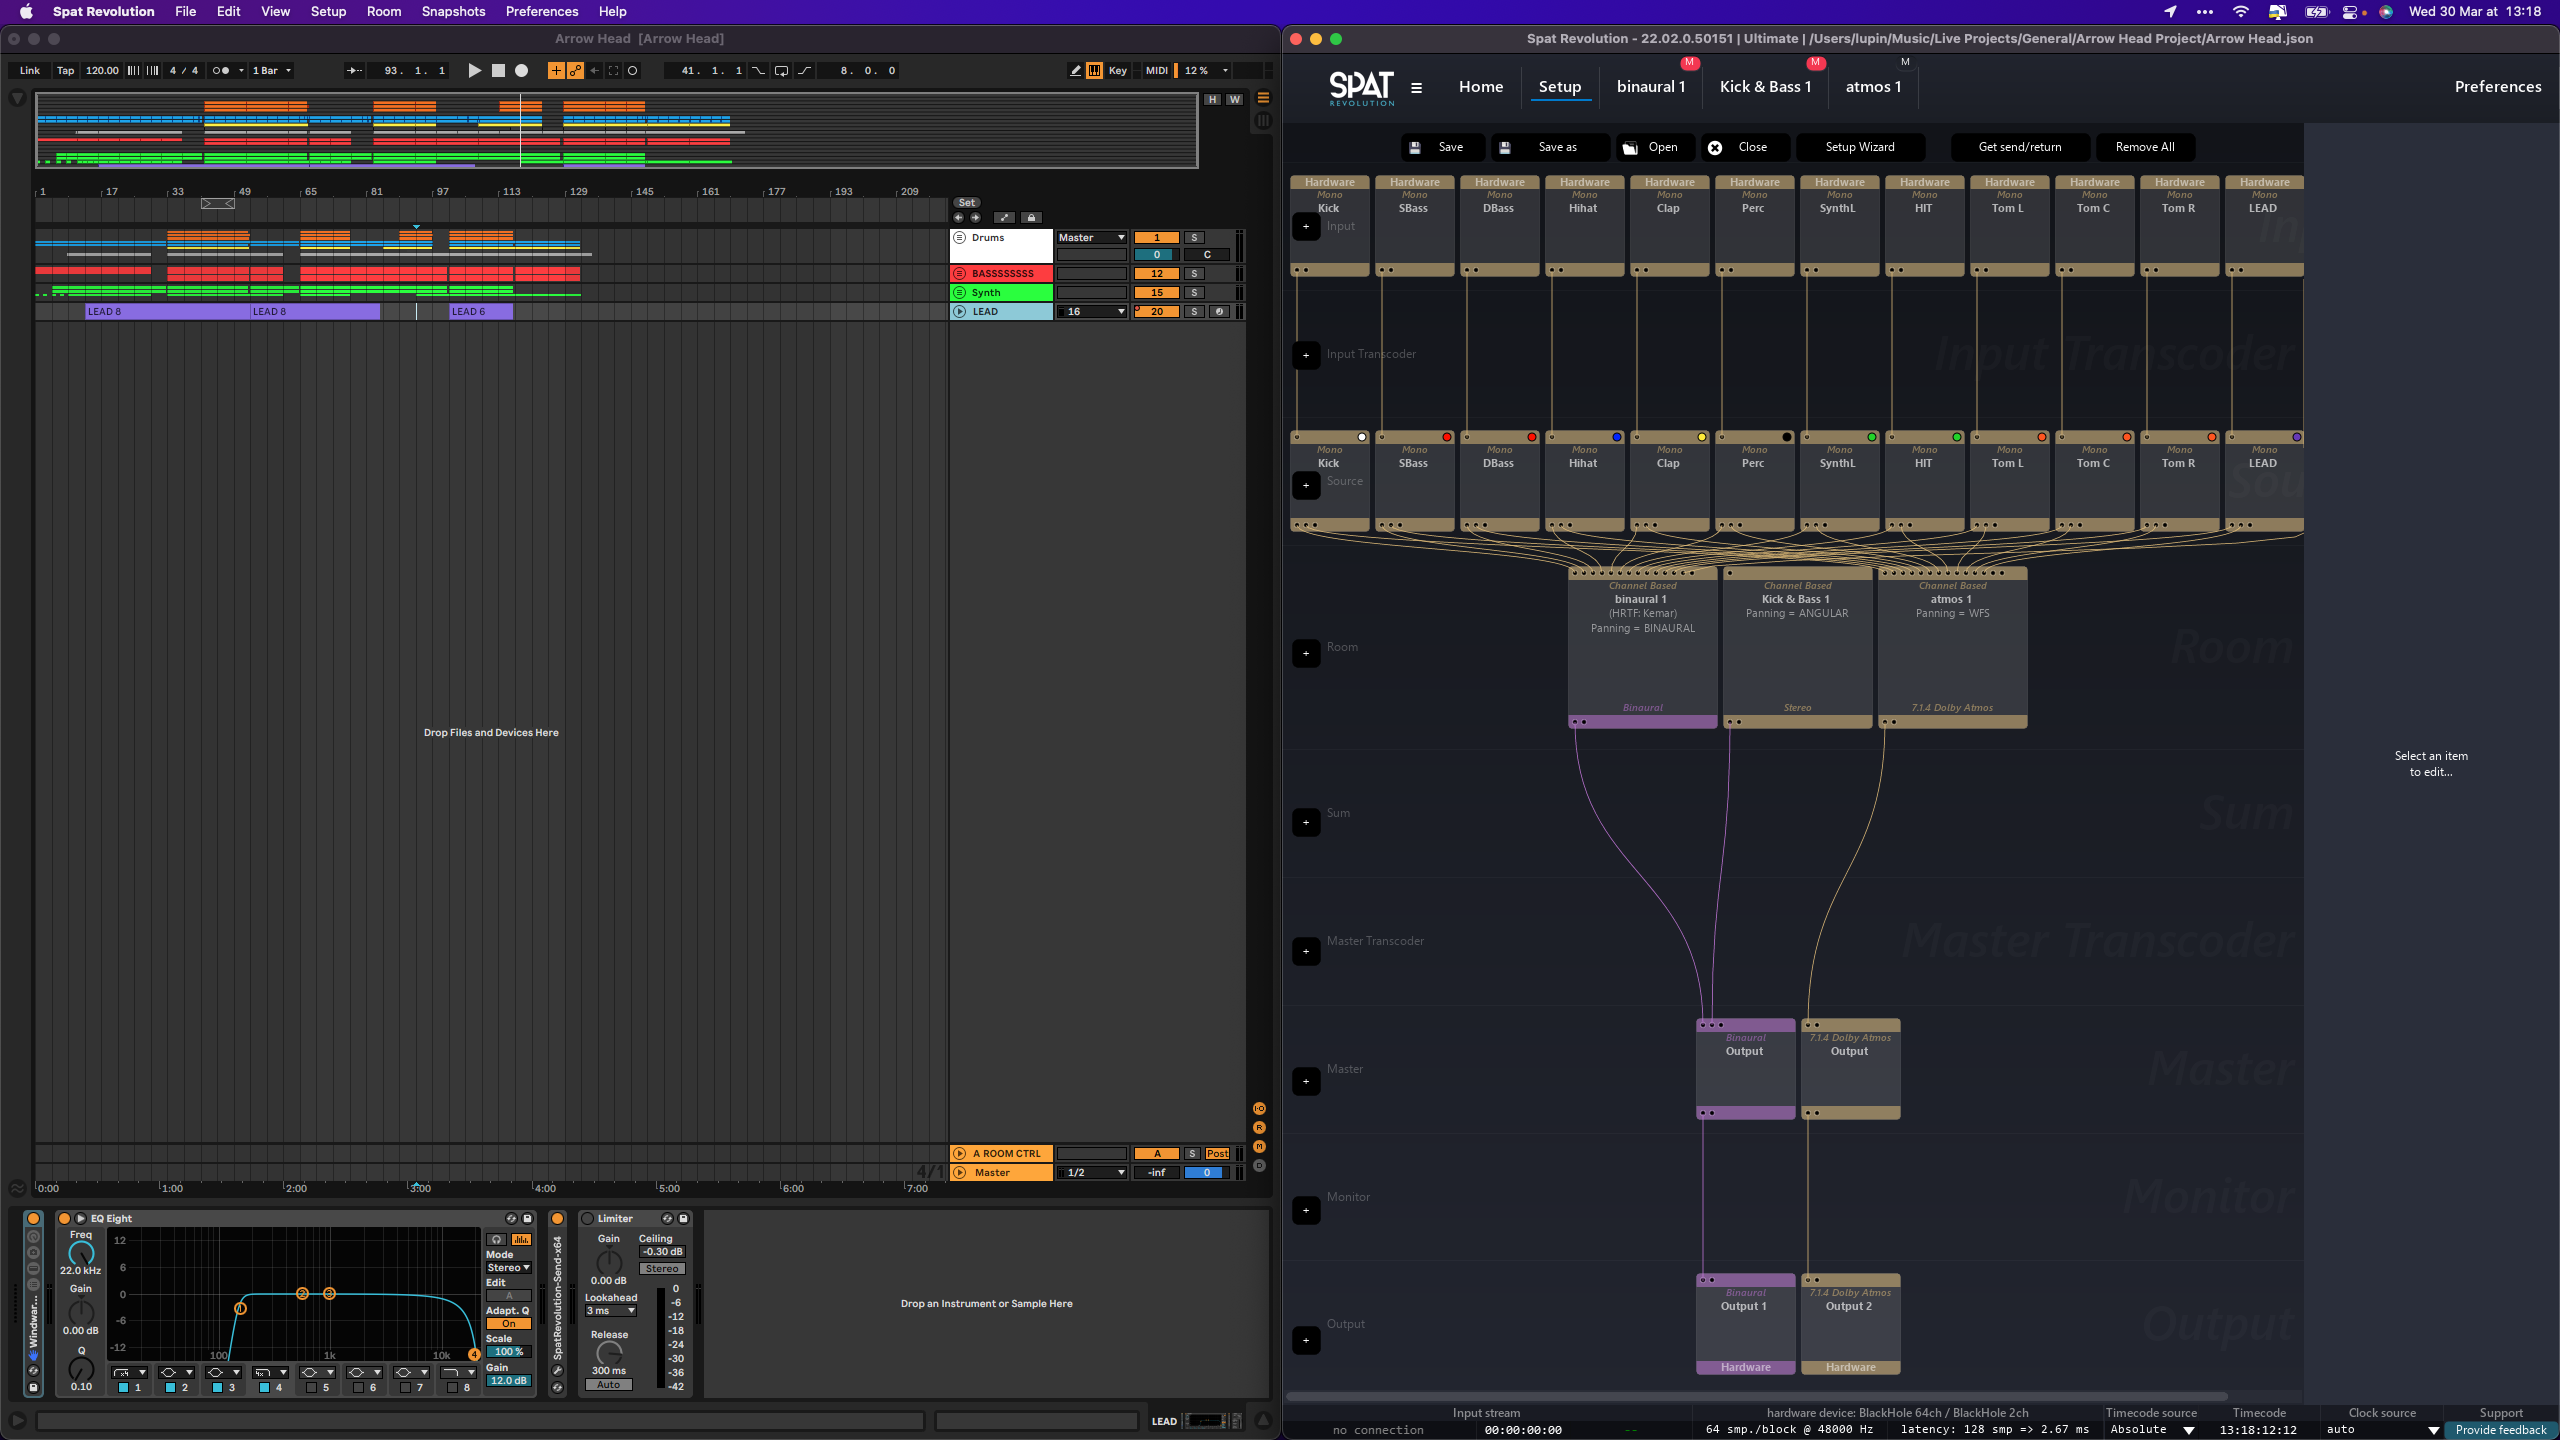
We will start by creating an “Aggregate Device” in the “AUDIO MIDI SETUP” panel of macOS: 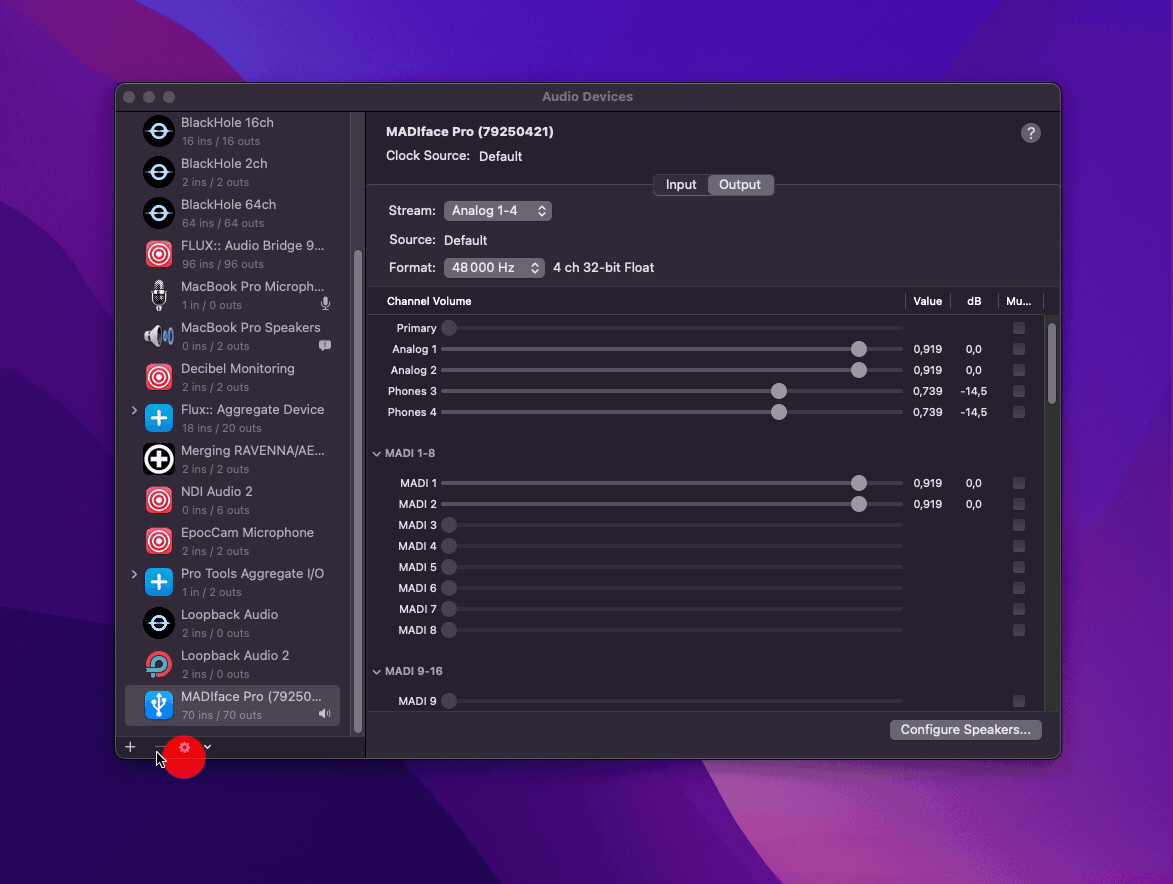
Both Ableton Live and SPAT Revolution must be relaunched to detect the newly created Aggregate.
Then we will use this device as Output in SPAT Revolution and Input in Ableton Live, set the out channels of the binaural output block to the two corresponding channels of my 2ch device and the rest to the Atmos output.
Then the only thing left to do is to create the tracks in Live that will receive the audio coming out of SPAT Revolution, routing them accordingly, press record and let the thing play!
From Single Machine to Dual Computer Setup
This part is also available as a YouTube Video here: https://youtu.be/TnZSjCVULlQ
The process of switching this workflow from a single computer to a dual one is pretty simple.
But why? If you have a heavier Ableton Live Session and want to reduce the load on your computer, that is often the why here.
We will need two things to make it possible, besides having two computers of course.
- a network audio solution such as MADI, DANTE, RAVENNA, etc…
- and a network switch to send the OSC automation from the computer hosting Live to the one with SPAT Revolution
We could do it via a Wi-Fi network, but there are better things in terms of speed and stability.
So now, let’s change the Output device in Ableton Live for our network audio solution and do the same for the Input device in SPAT Revolution.
Check that all the channels are active in Live
Depending on which Network Audio Solution you use, you might need to re-route some of your channels, as output one will not always mean it will go into input one.
And now we need only to set up the new IPs as we are not sending the OSC automation locally.
Simply go into the SPAT Preferences and change (in the OSC Connections part) the plugin Outputs to the IP address of the Live Computer.
Make sure you are using the IP of the correct network if you work with multiple ones.
Select the corresponding IP for the plugin Input.
Now, we need to do the same inside for the spat plugins inside Live.
Go back to Ableton Live, open the plugin ROOM in your ROOM track, put the IP address of the computer hosting SPAT as the output, and select the IP corresponding IP address as your input. Do the same for the RETURN and the SEND.
Of course, don’t forget to check if the OSC is enabled in the preferences, or SPAT will not receive anything.
Once this is done, our automation should now be received in SPAT.
And that is it!
Uninstall
With the FLUX Center
To Uninstall the Ableton Live Tools for SPAT Revolution with the FLUX:: Center, simply open the Center and click uninstall next to the Ableton Live Tools for SPAT Revolution.
Manually
To Uninstall the Ableton Live Tools for SPAT Revolution, simply go to this location:
/Library/Application Support/Flux
And delete the Ableton Live Devices Folder.
Credit
Ryan Farber for his M4L device: (Simple One-Button Macro 2.0)
ELPHNT for his M4L device: (NTPD2 Lite)
Devin Roth for creating BlackHole:
To the Ableton Team for making such an amazing DAW.
Troubleshooting / Q&A
Windows?
Q: Do you plan on making a Windows-specific guide?
A: Probably if we get some requests for it.
OSC issues? (Automation not going to SPAT)
If a source in SPAT does not seem to receive the Automation parameters, please check the following:
- Does the OSC Output port and IP Output in the send plugin (ref n°13 in the SEND description) match the IP and port inside the OSC settings (Preference panel in SPAT)?
- is OSC enabled (Preference panel in SPAT)
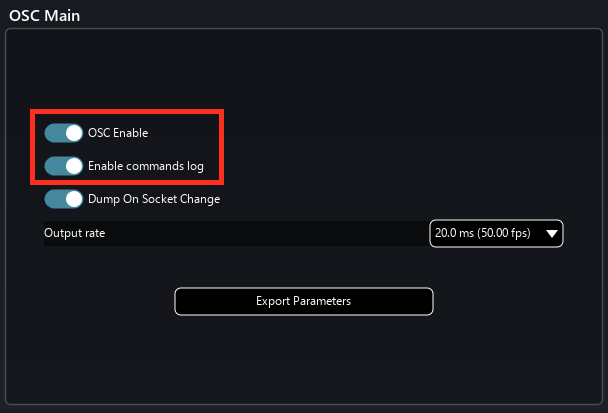
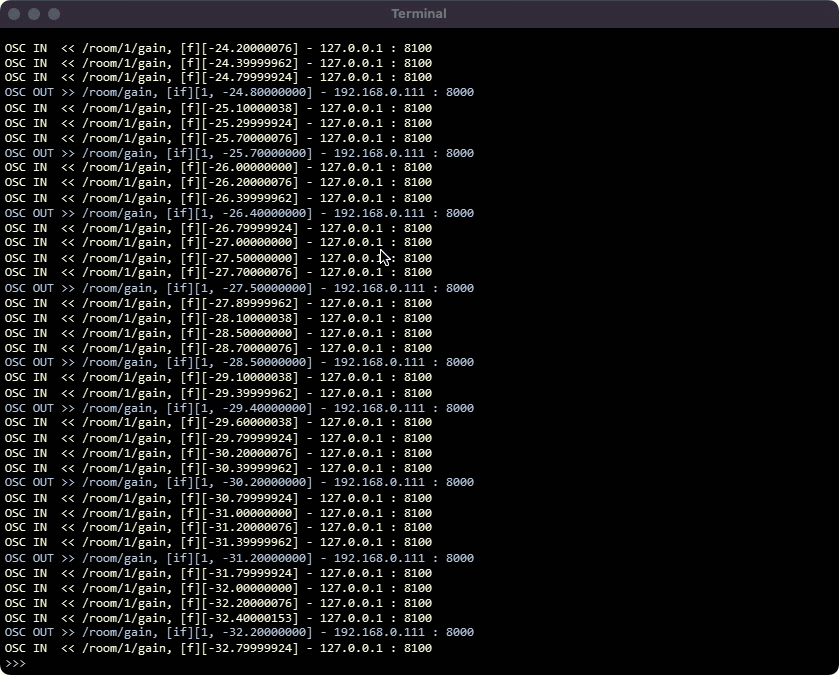
If you want to see if SPAT is correctly receiving the OSC messages, you can activate the “Enable commands log” option, which will now display every message received by SPAT in the Terminal.
You can open the SPAT Terminal with the following shortcuts:
Show/Hide Terminal = F7
Show/Hide Terminal (mini) = shift+F7
Popup Terminal = cmd+F7
- also make sure the OSC Index number in the SPAT plugin (inside the send device) matches the number of the track inside SPAT Revolution
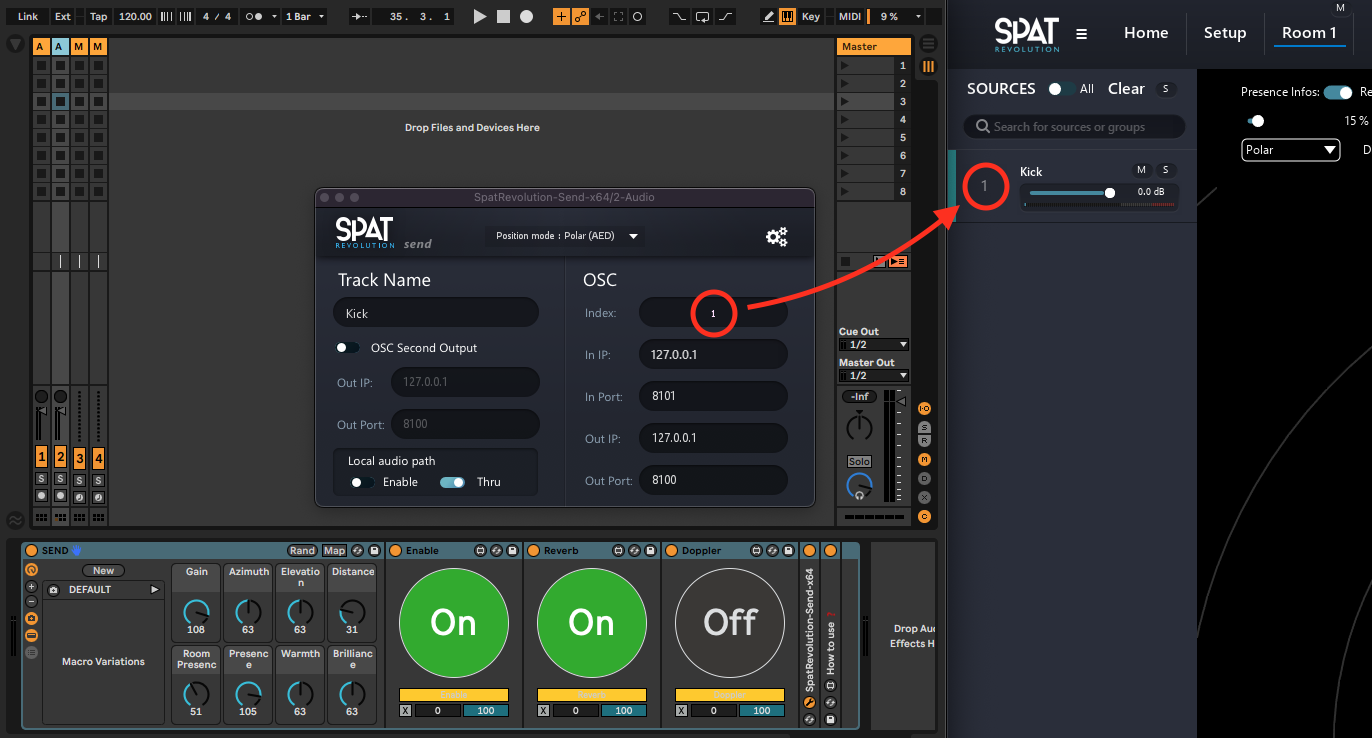
You can apply the same treatment to the ROOM and RETURN as well if the automation on those aren’t working too.
So, to sum up again:
- IP in/out check in both the plugins and in the SPAT Revolution Preferences
- OSC Index check in both the plugin and the source number in SPAT Revolution
- And, of course, check if OSC is simply not activated
If you work with moving setup, you might get an error showing the OSC Port in red. To fix it, simply change the IP address to another network and then return to the original one.
If that does not do it, you can also change the OSC Port to something else, and then set back the correct port number.
SPAT Revolution Essential license?
Q: Is this workflow compatible with the Essential license of SPAT Revolution?
A: You do not have to get the Ultimate version to start creating with this workflow.
Demo Sessions?
Q: Is there demo sessions so I can have a quick look?
A: Yes, they are located in the same folder as the rest of the tools found here: /Library/Application Support/Flux/Ableton Live Devices/SPAT/demo sessions