Animation System
The Animation system in SPAT Revolution lets you automate source movement and parameter changes over time. Instead of manually moving sources or adjusting parameters, you can create animations that do it for you — whether it’s a source orbiting around the listener, oscillating back and forth, or following a custom path you’ve drawn.
There are two types of animations:
- LFO (Low Frequency Oscillator) — Continuously oscillates a single source parameter using a periodic waveform. For example, you could use an LFO to make a source slowly pan left and right, or to gently modulate a reverb parameter over time.
- Trajectory — Moves sources along a user-defined 3D path made of waypoints. For example, you could draw a circular path and have a sound effect travel around the listener.
Each animation can be assigned to one or more sources. For each source, you can set a depth value (0–100%) that controls how much the animation affects that source. This means you can have one animation driving several sources with different intensities — for instance, one source moving in a wide orbit while another follows the same path but with a much smaller movement.
Common Animation parameters
All animations — whether LFO or Trajectory — share a set of common parameters:
- Name — A custom label for the animation. By default, new animations are named “Animation N” (where N is a number).
- Number — The display order in the animation list. This is read-only and updates automatically when you reorder animations.
- Remote Number — An editable identifier used for OSC remote control, independent of the display order. This works the same way as cue remote numbers (see Cue System).
- Play State — A toggle to start or stop the animation.
- Transport Sync — When enabled (the default), the animation starts and stops along with the SPAT Revolution transport. This is useful when you want animations to play only during playback.
- Transport Anchor — When enabled (the default), the animation’s phase is locked to the transport position. This means if you seek to a different point in the timeline, the animation jumps to the corresponding phase. When disabled, the phase accumulates freely from elapsed time.
- Tempo Sync — When enabled, the animation’s rate or duration is expressed in bar divisions (musical tempo) instead of Hz or seconds. The tempo (BPM) can be synchronized with other applications using the Ableton Link protocol — see Ableton Link below.
- Phase Offset — An initial phase shift (0–360°) applied to the animation. For example, setting this to 180° starts the oscillation at the opposite point in its cycle.
- Direction — Choose
ForwardorBackwardplayback. - Phase Spread — Distributes multiple assigned sources across the animation cycle (0–100%). At 100%, sources are evenly spaced around the full cycle. For example, with 3 sources and 100% phase spread, each source is offset by 120° from the next, creating a chasing effect.
LFO Animations
An LFO animation continuously oscillates a single source parameter using a periodic waveform. It is a great way to add organic, evolving movement to your spatial mix without having to automate every detail by hand.
What can an LFO modulate?
An LFO targets exactly one parameter at a time. There are two categories:
- Spatial parameters — Position-related parameters such as Azimuth, Distance, Elevation, X, Y, or Z. When you use a spatial LFO, the source’s movement is previewed in the 3D view. For example, an LFO on the Azimuth will make the source pan around the listener.
- Generic parameters — Other source parameters like Gain, Spread, Warmth, and more. These are modulated as a normalized percentage (0–100%). The movement is not displayed in the 3D view.
LFO Parameters
- Target — Which parameter to modulate. Choose from
Azimuth,Distance,Elevation,X,Y,Z, or any other parameter. - Waveform — The shape of the oscillation:
Sine(smooth wave),Triangle(linear ramp up and down),Sawtooth(linear ramp with sharp reset),Square(instant jumps between two values), orRandom(random values at each cycle step). - Rate — The oscillation speed in Hz (0.01–20 Hz). For example, 1 Hz means one full oscillation cycle per second. This is used when Tempo Sync is off.
- Rate Sync — When Tempo Sync is enabled, this replaces Rate and lets you set the oscillation period in bar divisions (e.g. 1/4 bar).
- Amplitude — The size of the oscillation, in the target parameter’s native units. For example, if the target is Azimuth, the amplitude is in degrees (up to 360°). A larger amplitude means a wider movement.
- Smoothing — Smooths the transitions in the
Randomwaveform (0–100%). Has no effect on other waveform types.
The maximum amplitude depends on the target parameter:
| Target | Unit | Maximum Amplitude |
|---|---|---|
| Azimuth | ° | 360 |
| Distance | m | 100 |
| Elevation | ° | 180 |
| X, Y, Z | m | 200 |
| Generic parameter | % | 100 |
Available waveforms
Each waveform produces a different kind of oscillation:
- Sine — A smooth, continuous wave. The most natural-sounding choice for gentle movement.
- Triangle — A linear ramp up and down, producing a steady back-and-forth motion.
- Sawtooth — Ramps linearly in one direction, then resets sharply. Useful for sweeping effects, or for azimuth rotation.
- Square — Jumps instantly between two extreme values. Good for abrupt position switches.
- Random — Generates random values at each step. Use the Smoothing parameter to blend between steps for a more gradual random movement.
How Phase Spread works with LFOs
When multiple sources are assigned to the same LFO, Phase Spread distributes them across the oscillation cycle. The first source in the assignment list gets the largest phase offset, and the last source gets no offset.
For example, with 3 sources and Phase Spread set to 100%, the sources are offset by 240°, 120°, and 0° respectively — creating a staggered “chasing” effect where each source follows the same oscillation pattern but at a different point in the cycle.
Trajectory Animations
A trajectory animation moves sources along a user-defined 3D path made of waypoints. The path forms a closed loop, and sources continuously travel along it at a configurable speed. This is ideal for creating circular movements, fly-by effects, or any custom spatial path you can imagine.
Position Mode
Trajectory animations use Absolute position mode by default: the waypoints define exact positions in the 3D space, and the source moves to those exact coordinates.
If multiple absolute trajectory animations target the same source, the last animation in the list takes priority.
Waypoints
Each waypoint in a trajectory has the following parameters:
- Position (X, Y, Z) — The 3D coordinates of the waypoint, in meters.
- Speed (x) — A per-segment speed multiplier. A higher value makes the source move faster through the segment that starts at this point. For example, a value of 2.0 makes that segment travel twice as fast as 1.0.
- Time (%) — The share of the total trajectory duration assigned to the segment that starts at this point. This is editable in Time mode.
- Tension — Controls the curvature of the path between waypoints (-0.99 to +0.99, default 0). A value of 0 creates straight lines between waypoints. A value around 0.55 produces smooth, circular arcs. Negative values create inward curves.
Speed and Time modes
Freeform trajectories can define segment timing in two ways:
- Speed — The grid exposes the
Speed (x)column. Each point controls the relative speed of the following segment, and SPAT Revolution derives the resulting segment time from the path length and speed factor. - Time — The grid exposes the
Time (%)column and the lock column. Each point controls how much of the total animation duration is spent on the following segment. SPAT Revolution adjusts the underlying speed factors so the requested time distribution is preserved.
Use Speed mode when you want a physical-feeling path where longer segments naturally take more time unless you speed them up. Use Time mode when the musical or show timing matters more than distance, for example when a source must spend 25% of the cycle on one side of the room and 75% on the other.
The trajectory duration itself is still set by the animation duration control. When Tempo Sync is off, duration is expressed in seconds. When Tempo Sync is on, duration is expressed as a musical division of the current tempo.
Point grid editing
The point grid is the numerical editor for a trajectory. It can be used together with the trajectory view: selecting a point in the grid selects the same point in the view, and selecting or dragging a point in the view updates the grid selection.
The grid toolbar provides:
- Insert point — Adds a point at the midpoint of the segment after the selected point.
- Delete point — Removes the selected point.
- Move up / Move down — Reorders the selected point in the trajectory. The order determines the travel sequence.
- Shape preset — Replaces the current point list with a factory shape, or clears it when switching to Custom.
- Speed mode — Switches the grid between Speed and Time editing.
- Reset Speed / Reset Time — Resets segment timing to uniform defaults:
Speed (x) = 1.0in Speed mode, or equalTime (%)values in Time mode.
Time locks and redistribution
In Time mode, all segment percentages must add up to 100%. When you edit one Time (%) value, SPAT Revolution redistributes the remaining time across the other unlocked segments.
Use the lock column to protect a segment’s time percentage while adjusting the others. Locked segments are skipped during redistribution. The editor prevents you from locking so many segments that fewer than two unlocked segments remain, because at least two unlocked values are needed for a meaningful redistribution.
When points are inserted or removed in Time mode, redistribution depends on how the edit was made:
- Toolbar insert — Splits the parent segment’s time between the existing segment and the inserted segment.
- Toolbar delete — Merges the removed segment’s time into the adjacent segment.
- Draw mode edits — Redistribute unlocked segments uniformly, which is usually the expected behavior when sketching a path from scratch.
Shape Presets
When creating a new trajectory, you can start from one of several factory presets that provide common geometric shapes:
- Custom — An empty trajectory for building your own path from scratch.
- Square — A 4-point counter-clockwise square (3 m half-width).
- Triangle — A 3-point equilateral triangle (4 m circumradius).
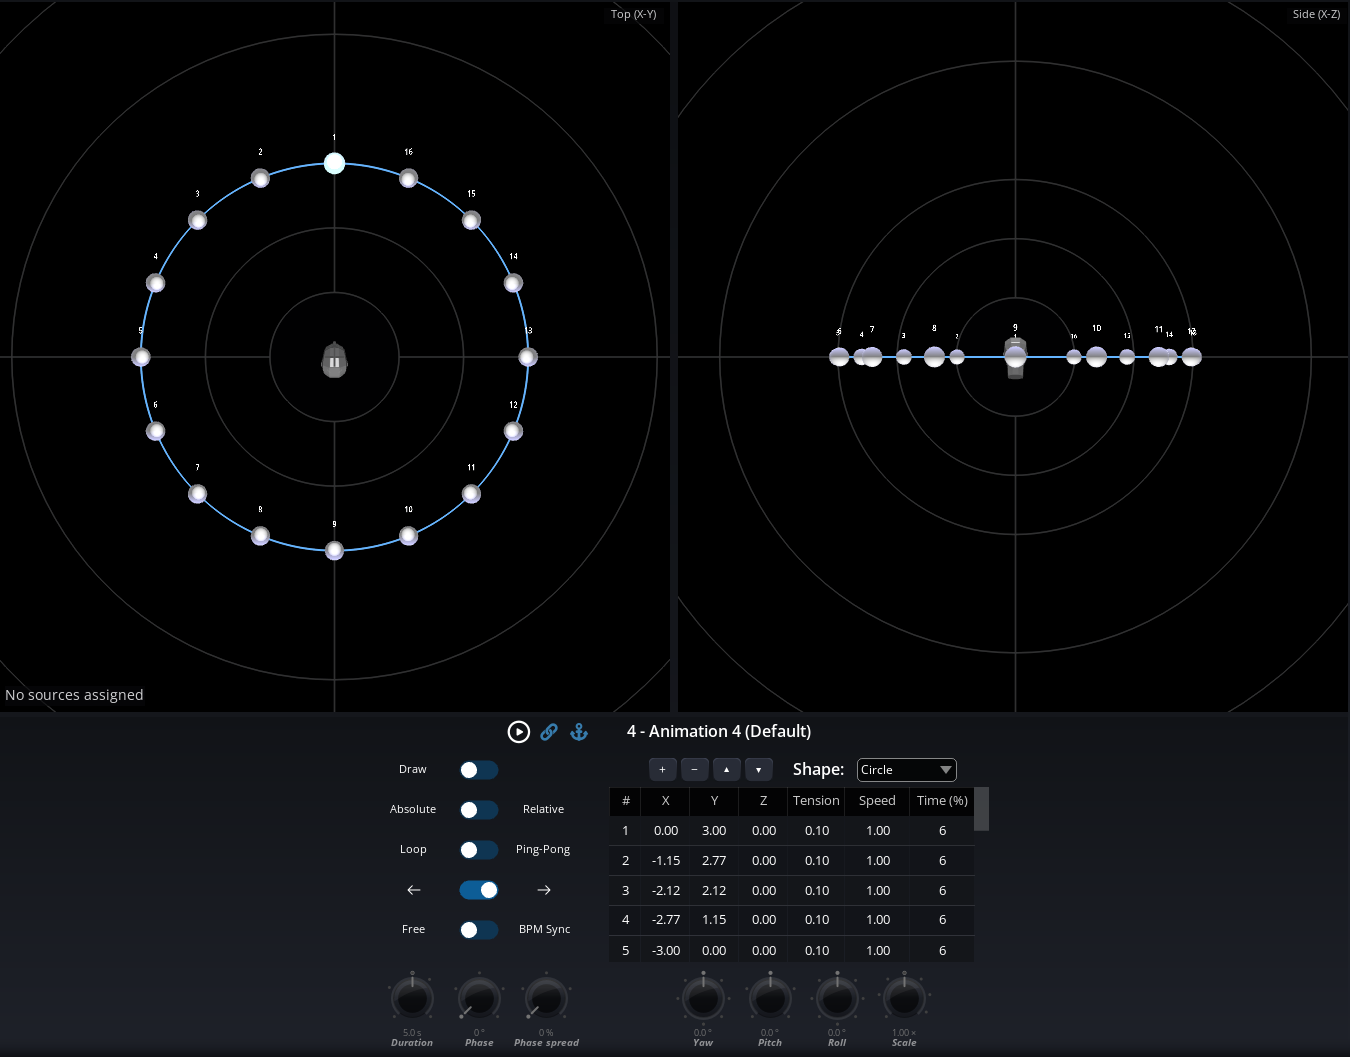
- Circle — A 16-point circle approximation with tension arcs (3 m radius).
You can always modify the preset shape after creation by moving, adding, or removing waypoints.
Transform Controls
Once you have defined a trajectory path, you can apply transforms to the entire path without editing individual waypoints:
- Yaw — Rotate the path around the vertical (Z) axis (−180° to +180°).
- Pitch — Tilt the path forward/backward around the Y axis (−90° to +90°).
- Roll — Roll the path around the X axis (−180° to +180°).
- Scale — Uniformly scale the path larger or smaller (0.1 to 10.0, default 1.0).
For example, you could create a circle trajectory and then use the Pitch transform to tilt it into a vertical plane, turning a horizontal orbit into a vertical one.
Source Assignments
Assigning sources to an animation
To assign sources to an animation, use the Source Inspector → Animations panel, or use OSC commands. You can also use the Assign Sources action in the cue system Cue System to automate assignments during a show.
Each assignment links a source to the animation with two key parameters:
- Depth — Controls how much the animation affects this source (0–100%). At 100%, the source follows the full animation movement. At 50%, the movement is halved. This defaults to 100% for new assignments.
- Source Index — The source’s position in the animation’s assignment list, which determines its phase spread offset.
The depth value is remembered even if you unassign and later reassign a source — SPAT Revolution restores the previous depth value automatically.
How depth works in practice
For LFO animations, the depth scales the oscillation amplitude. For example, if an LFO oscillates the Azimuth by ±30° and a source has a depth of 50%, that source will only oscillate by ±15°.
For Trajectory animations, the depth controls how closely the source follows the path. At 100%, the source moves to the exact trajectory positions. At lower values, the source only partially follows the path.
Base position
When a source is first assigned to an animation, SPAT Revolution captures the source’s current position as its base position. This is the reference point that the animation modifies. If you manually move a source while an animation is playing, the base position updates accordingly — so the animation will oscillate around the new position.
When all animations are removed from a source, its position is automatically restored to its base position.
How animations are processed
SPAT Revolution processes animations in a specific order to ensure predictable results when multiple animations affect the same source:
Absolute trajectories are applied first. If a source has an absolute trajectory animation, the source is moved to the position defined by the trajectory path. If multiple absolute trajectories target the same source, the last one takes priority.
LFOs and relative animations are applied second. Spatial LFOs modulate individual position parameters (like Azimuth, Elevation, or X/Y/Z) on top of the position established in step 1.
If both AED (Azimuth/Elevation/Distance) and XYZ parameters are simultaneously modulated by LFOs on the same source, the AED modulation takes priority.
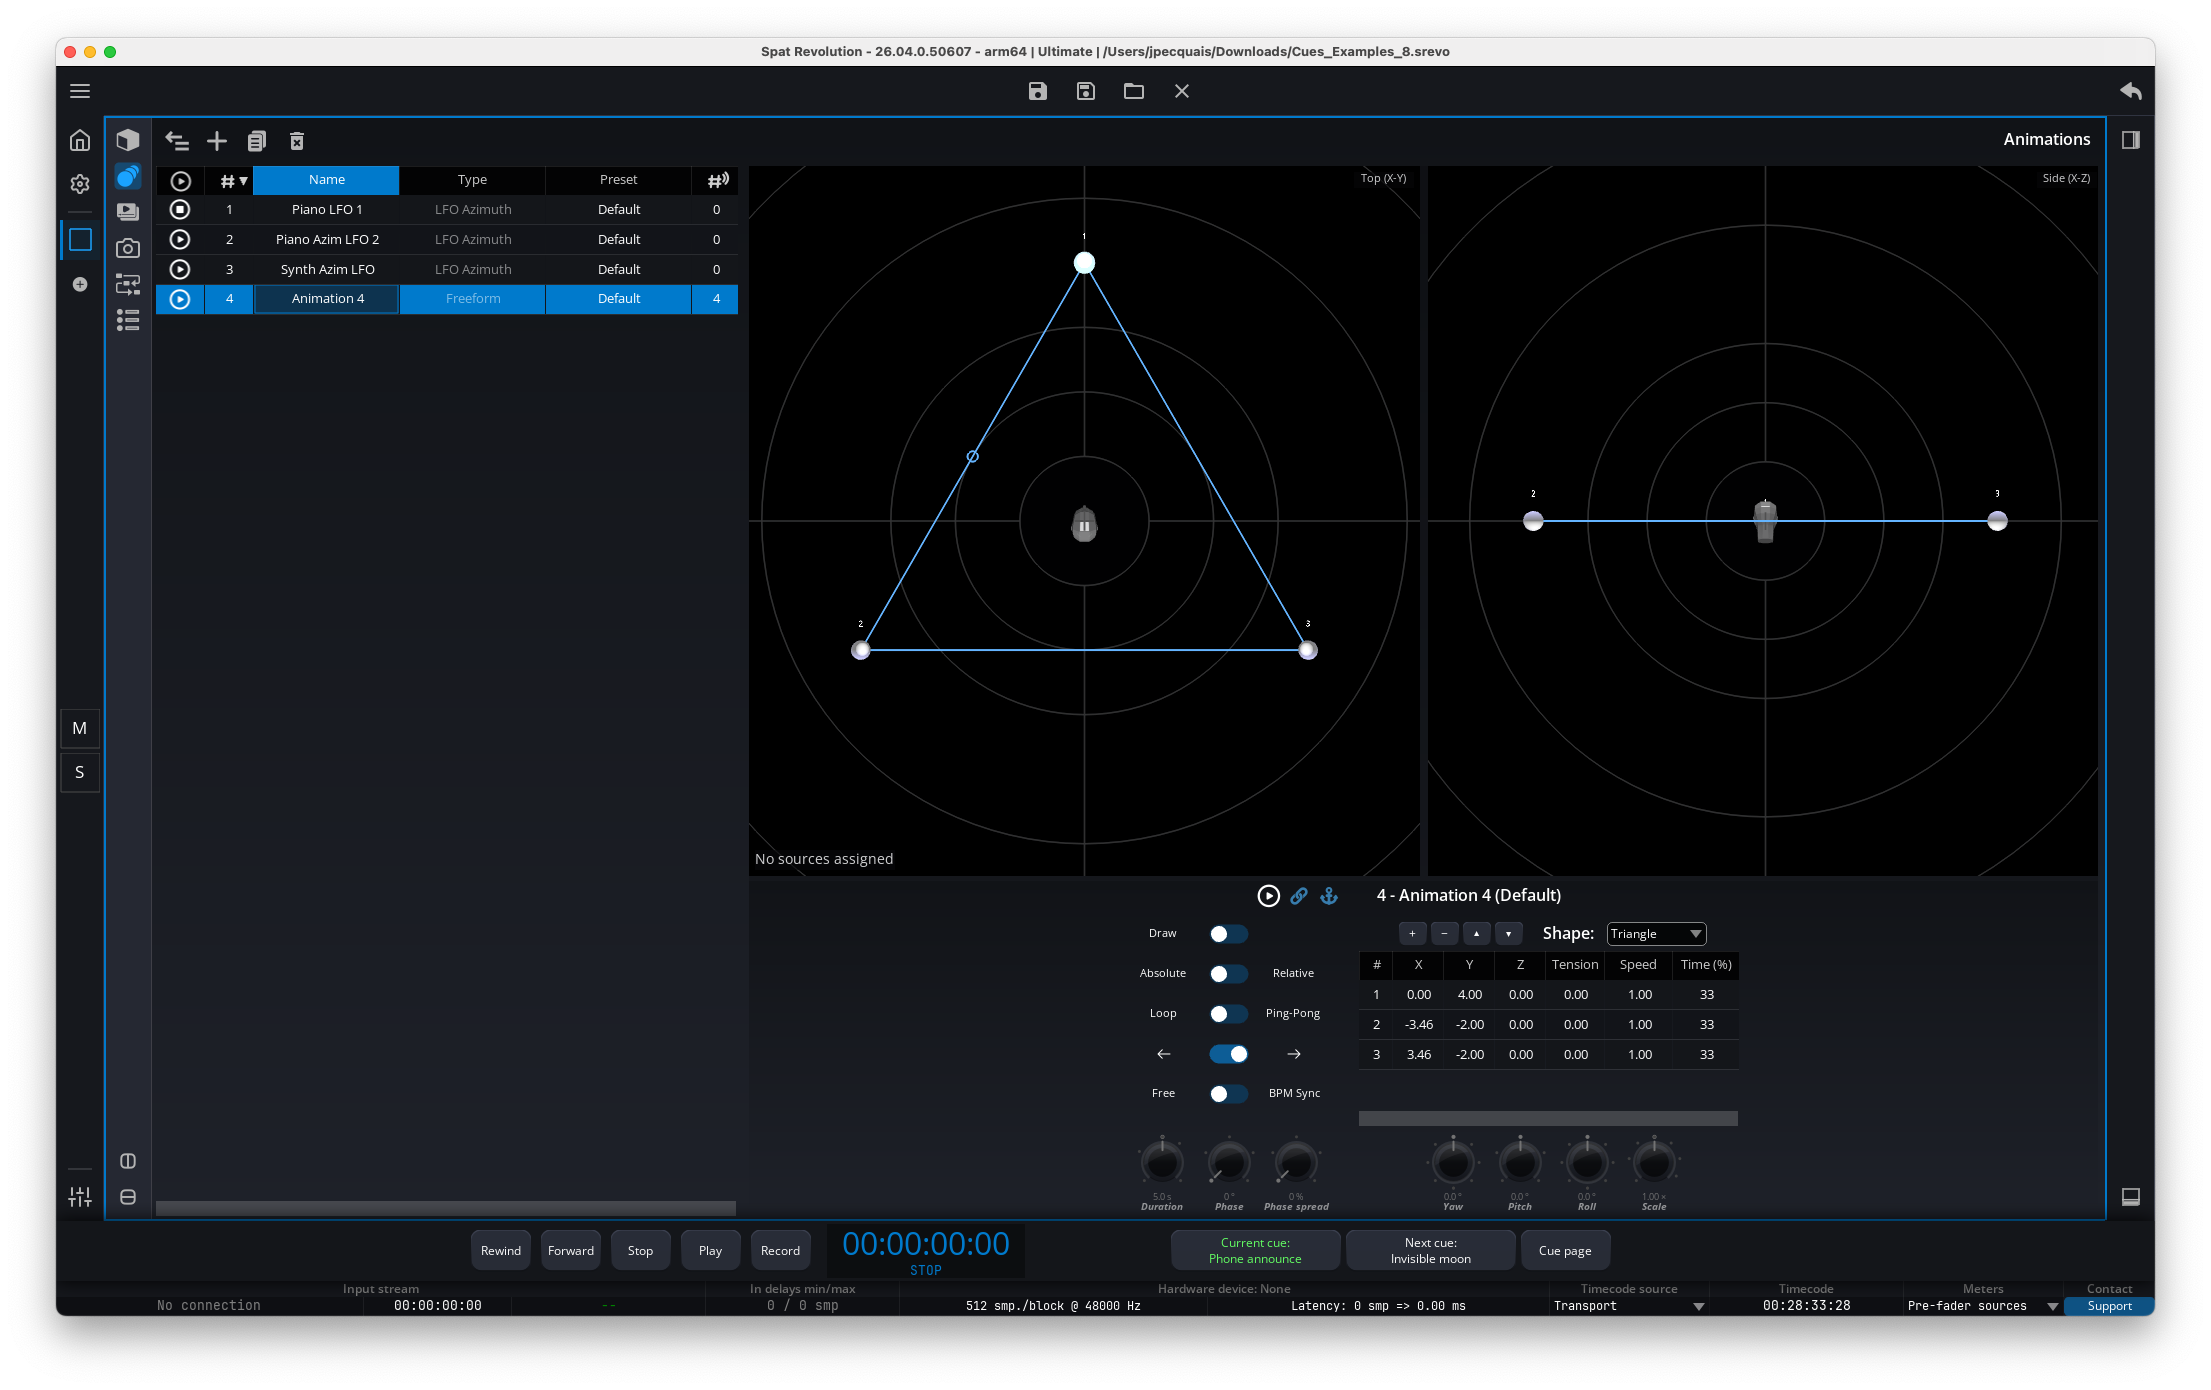
Animation Page
The Animation panel can be displayed inside any user-defined page by selecting it from the panel toolbar (see User Interface User Interface). The panel is divided into two main areas: the animation list on the left and the animation view and controls on the right.
Toolbar
A toolbar at the top of the page provides the main animation management actions:
Fold— Collapse or expand the animation list. When folded, the view and controls take up the full width of the page.Add— Opens a menu to create a new animation. You choose the animation type (LFO or Trajectory) and the target parameter.Duplicate— Duplicates the selected animation(s). The copy is named with a “(Copy)” suffix.Delete— Deletes the selected animation(s). If the animation is referenced by cues, a confirmation dialog will appear to prevent accidental deletion.
Animation list
The animation list displays all your animations. Click on an animation to select it and view its details on the right side of the page.
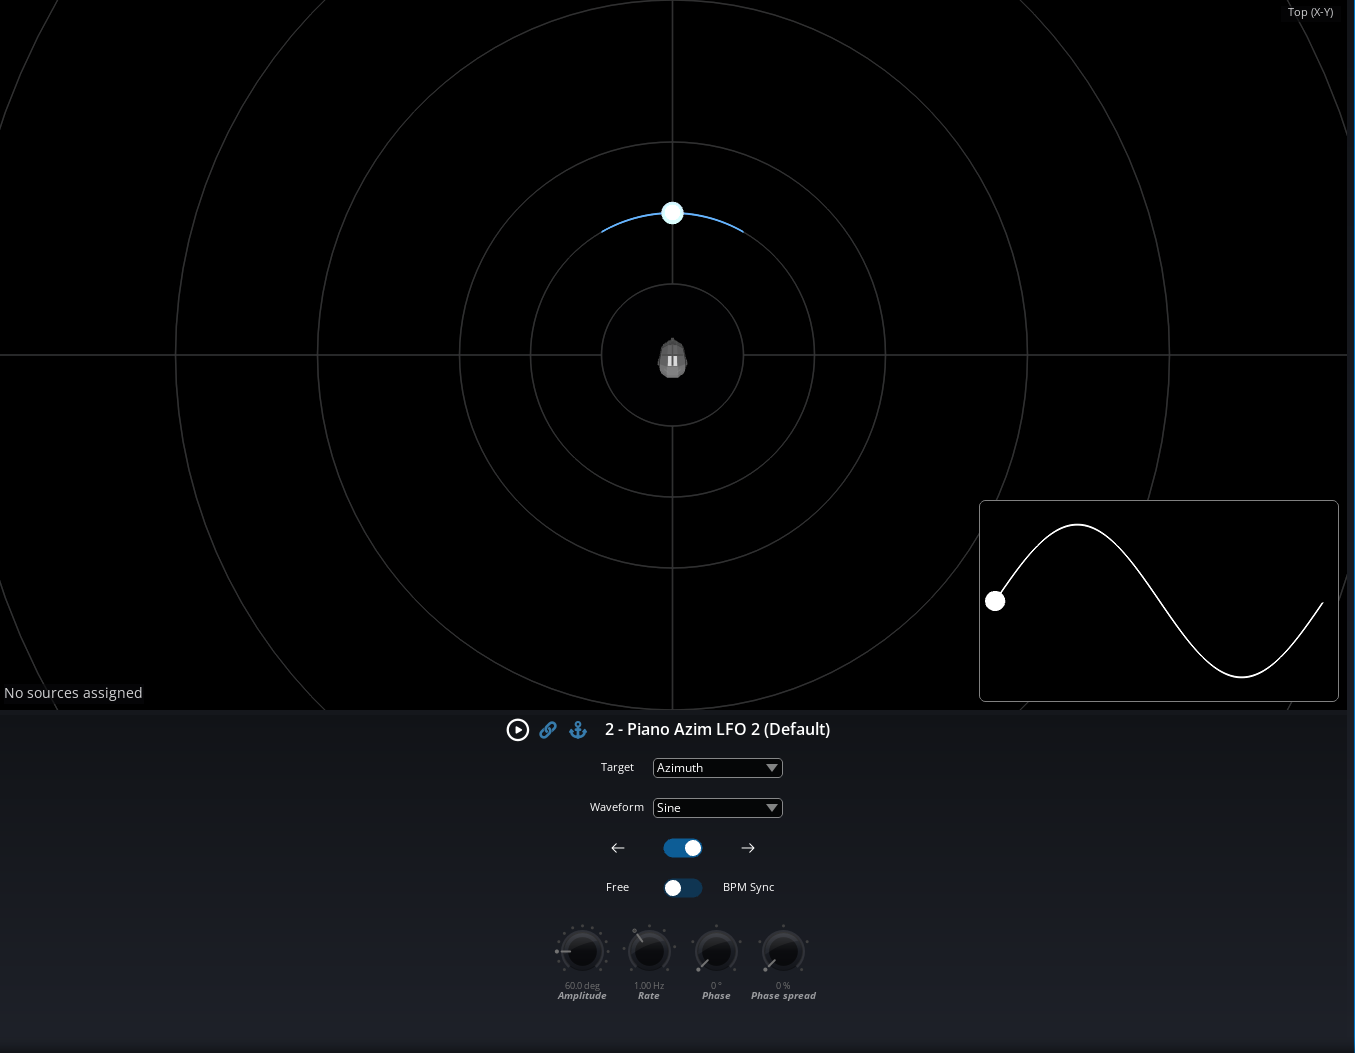
View and controls
When you select an animation in the list, the right side of the page shows:
For LFO animations: a 3D waveform preview showing the oscillation pattern, along with rotary knob controls for all LFO parameters (Rate, Amplitude, Phase Offset, Phase Spread, Direction, Smoothing) and dropdown menus for Target and Waveform. The header provides Play/Stop, Transport Sync, and Transport Anchor toggles.
For Trajectory animations: a dual orthographic view showing the trajectory path from the top (X-Y) and from the side (X-Z), along with a point grid where you can edit each waypoint’s coordinates (X, Y, Z), segment timing (
Speed (x)orTime (%)), lock state, and Tension. Below this, you will find controls for Duration, Phase Offset, Phase Spread, Direction, Loop Mode, Position Mode, BPM Sync, and the Transform controls (Yaw, Pitch, Roll, Scale).
Using Animations with the Cue System
Animations can be controlled automatically using the Cue System Cue System. By adding an Animation action to a cue, you can:
- Play or Pause an animation at a specific moment in your show.
- Assign or Unassign sources to an animation on the fly.
For example, you could set up a cue that starts a circular trajectory animation on your lead vocal source at the beginning of a chorus, and another cue that pauses it at the end.
Ableton Link
SPAT Revolution supports Ableton Link, a protocol that synchronizes musical tempo (BPM) across applications and devices on the same network. When Ableton Link is enabled, all animations using Tempo Sync share the same BPM and beat grid with other Link-enabled applications — such as Ableton Live, other DAWs, or mobile apps.
This is especially useful in live performance scenarios where you want source movements (LFO oscillations or trajectory cycles) to stay in time with the music. Any application on the network can change the tempo, and all connected applications follow along. By default, SPAT Revolution follows and emit the start and stop signals from and to other devices. This behavior can be turned off in the preferences of SPAT Revolution.
Ableton Link can be enabled from the timecode source selector in the transport bar — see global bars section Global Bars for details.
Ableton Link synchronizes BPM only — it does not sync playback position. Each application manages its own transport independently. When Link is active, the BPM value in SPAT Revolution follows the shared Link tempo.
OSC Remote Control
Each animation can be remotely controlled via OSC messages. All OSC addresses use the animation’s remote number as an index. For example, if an animation has remote number 2, you would use /animation/2/play to start it.
The following OSC addresses are available:
| OSC Address | Description |
|---|---|
/animation/[N]/dump |
Requests SPAT Revolution to send back all parameters for animation N. |
/animation/[N]/name |
Gets or sets the animation name. |
/animation/[N]/play |
Gets or sets the play state (send 0 to stop, 1 to play). |
/animation/[N]/transportsync |
Gets or sets transport sync (0 = off, 1 = on). |
/animation/[N]/transportanchor |
Gets or sets transport anchor (0 = off, 1 = on). |
/animation/[N]/temposync |
Gets or sets tempo sync (0 = off, 1 = on). |
/animation/[N]/phaseoffset |
Gets or sets the phase offset (0–360°). |
/animation/[N]/direction |
Gets or sets the playback direction (0 = backward, 1 = forward). |
/animation/[N]/phasespread |
Gets or sets the phase spread (0–100%). |
/animation/[N]/rate |
Gets or sets the LFO rate in Hz (when tempo sync is off). |
/animation/[N]/duration |
Gets or sets the trajectory duration in seconds (when tempo sync is off). |
/animation/[N]/syncdivision |
Gets or sets the rate/duration as a bar division (when tempo sync is on). |
When animations are running, they generate high-frequency parameter changes. Each OSC output socket has a Send Animation Value option that controls whether those animated values are sent from that socket. See Send Animation Value preference Send Animation Value for details and recommended settings.
Snapshot Integration
When you store a snapshot, the following animation-related data is saved as part of each source’s state:
- Animation assignment — Which animation (if any) is assigned to each source.
- Depth — The depth value for each source within its assigned animation.
This means that recalling a snapshot can change which animation is controlling a source, and with what depth. For example, you could have one snapshot where a source is assigned to a circular trajectory with a depth of 80%, and another snapshot where the same source is assigned to an LFO with a depth of 30% — or no animation at all.
The animation’s own parameters (waveform type, rate, amplitude, waypoints, etc.) are not stored in snapshots. Only the source-to-animation assignment and depth are snapshot-recalled. If you need to change animation parameters between cues, use animation-specific cue actions instead (see Cue System).
Saving and Loading Animations
All animation data is automatically saved as part of your SPAT Revolution session file (.srevo). This includes:
- The animation type (LFO or Trajectory), name, and remote number.
- All parameter values (waveform, rate, amplitude, duration, transforms, etc.).
- Source assignments and each source’s depth value.
- Trajectory waypoints with their position, timing mode values (
Speed (x)orTime (%)), lock state, tension, and order. - The shape preset used to create the trajectory.
When you reopen the session, all your animations are restored exactly as you left them.