Timeline System

The Timeline system in SPAT Revolution is a built-in media playback and automation engine. It lets you import audio files directly into SPAT Revolution and play them back with full spatialization — without needing a DAW. You can also record and play back spatial automation (source positions, gains, and other parameters) directly within a timeline.
A session can contain multiple independent timelines, each with its own playback state, gain, and looping settings. This is useful for layering different audio elements — for example, one timeline for background ambience and another for dialogue — each with independent playback control.
Each timeline is built from three building blocks:
- Tracks — Each track is linked to an input or source in your session. Input tracks carry audio data, while source tracks carry spatial automation data.
- Clips — Segments of audio or automation data placed on a track. A clip defines what plays and when.
- Markers — Named timecode positions within the timeline, used for navigation.
Timeline Properties
Each timeline in the list has the following properties, which you can view and edit directly in the timeline grid:
- Play — Start or stop playback for this timeline.
- Sync — Activates sync mode for this timeline (see below). Only one timeline can be in sync mode at a time.
- Num. — Display order number.
- Label — A custom name for the timeline. Defaults to the imported file name.
- In — The start point of the playback region, in timecode (
HH:MM:SS:FF). You can trim this to play only a portion of the imported audio. - Out — The end point of the playback region.
- Offset — A temporal offset applied to the timeline, allowing you to shift the entire timeline forward or backward in time.
- Gain (dB) — Output gain applied to all tracks in the timeline.
- Scale — A scale factor applied to automation data. For example, setting this to 0.5 would halve all spatial movements.
- Remote Number — An editable identifier used for OSC remote control, independent of the display order.
- Loop — The repeat count: enter a number for a fixed number of loops, or
∞for infinite looping. During playback, this displays the current loop progress (e.g.,2/5for the second of five loops).
Sync Mode vs. Trigger Mode
Timelines can work in two different ways, depending on whether Sync mode is enabled:
Sync Mode
When you enable the Sync toggle on a timeline, it becomes the active timeline for the session:
- The timeline’s playback position is driven by the main SPAT Revolution transport — pressing play, stop, or seeking in the transport controls the timeline.
- The waveform and clip view is displayed in the main panel, allowing you to see and edit the timeline content.
- Automation is processed even when the transport is stopped or paused — so when you seek to a position, all source properties update to match that point in time.
Only one timeline can be in sync mode at a time. Enabling sync mode on one timeline automatically disables it on any other.
Trigger Mode (non-sync)
When a timeline’s Sync toggle is off, it operates in trigger mode — a self-contained, autonomous playback mode:
- The timeline manages its own playback independently of the main transport.
- You can trigger playback manually (by clicking Play), via OSC, or via a Cue System action.
- Multiple timelines can play simultaneously in trigger mode, and they can also run alongside a timeline in sync mode.
- Loop and repeat settings are applied based on the Loop field value.
This is ideal for sound effects, ambient beds, or any audio elements that need to play independently of the main session transport. For example, you could have a background rain ambience looping indefinitely in trigger mode while you use sync mode on another timeline to work on dialogue spatialization.
Tracks, Clips, and Markers
Tracks
Each timeline contains tracks, and each track is linked to a specific input or source in your session. When you import an audio file, two types of tracks are created:
- Input Track — Linked to an input in your session. This track carries the actual audio media (the waveform data from your imported file).
- Source Track — Linked to a source in your session. This track carries spatial automation data — recorded changes to the source’s position, gain, and other properties over time.
Each track has a Number (auto-assigned), a Label (inherited from the imported file name), and its own set of markers.
Importing Audio Files
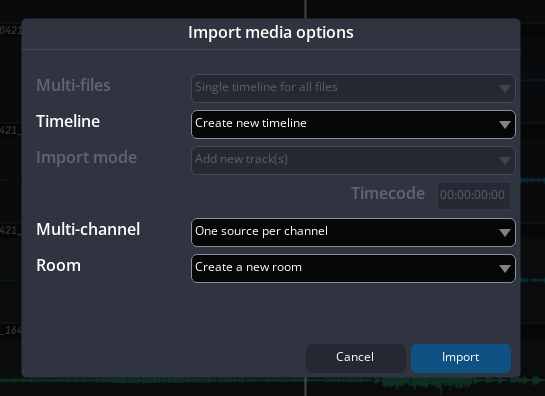
To create a new timeline, import one or more audio files into SPAT Revolution. The import dialog is the point where you decide whether the files create new session structure or extend existing timeline tracks. Supported media extensions are .wav and .bwf.
The dialog can show the following options, depending on the current session and the number of files selected:
| Option | Choices | Use it when |
|---|---|---|
| Multi-files | Single timeline for all files or One timeline per file | You import several files at once and need either one combined timeline or separate timelines for each file. |
| Timeline | Create new timeline or Add to - N - Name for each existing timeline | You either want a fresh timeline or want the imported media to be added to an existing one. |
| Import mode | Add new track(s), Append at the end of existing tracks, or Append to a specific timecode of the existing tracks | This appears when adding to an existing timeline. Choose whether the import creates new lanes or continues existing lanes. |
| Timecode | HH:MM:SS:FF |
This appears with the specific-timecode append mode and sets the placement point for the imported clips. |
| Multi-channel | One source per channel or One multichannel source | This appears for single-file imports. Choose independent sources when each channel must be spatialized separately; choose one multichannel source when the channels should stay together. |
| Room | Create a new room or Connect to room N - Name | Choose whether imported sources are wired into a new room or an existing room. When appending to an existing timeline, the room is inherited from the existing session routing. |
| Group sources | On/off checkbox, enabled by default | Groups the newly created sources after import. This is especially useful for ADM/object-based imports because it keeps the imported object set together in the source list. |
There are several import workflows available:
ADM Import (Audio Definition Model)
If your audio file contains ADM metadata (BW64/WAV format — commonly used in broadcast and immersive audio production), SPAT Revolution reads the embedded spatial information automatically. The import process:
- Reads the ADM audio objects from the file.
- Creates a Room, Master, and Output in your session.
- For each object in the ADM file, creates an Input and a Source, connects them to the Room, and creates both an audio track and an automation track.
- Imports all spatial automation data from the ADM metadata — including position (XYZ, Azimuth, Elevation, Distance), width, gain, and diffuse parameters.
- Configures the room speaker layout based on the ADM bed channel information.
- Activates sync mode on the new timeline so you can start working with it immediately.
This makes it very easy to open and spatialize ADM content directly in SPAT Revolution without any manual setup.
When Group sources is enabled, sources created by the import are grouped after the import completes. This does not change the ADM automation itself; it only organizes the created sources in the session so the imported object set can be selected, moved, colored, or managed as a group.
Simple WAV Import
For plain WAV files without ADM metadata, SPAT Revolution creates one multi-channel input and one multi-channel source, connects them to a room, and creates the corresponding audio and automation tracks. Sync mode is activated automatically.
One Source Per Channel
This import mode creates a separate source for each channel in the audio file. This is useful when you have a multi-channel recording where each channel represents a different sound source — for example, individual microphone feeds from a live recording — and you want to spatialize each one independently.
Appending to an Existing Timeline
When you choose an existing timeline in the Timeline field, the Import mode field decides how the new media is placed:
- Add new track(s) creates additional tracks in the selected timeline.
- Append at the end of existing tracks places the new clips after the current material on the existing tracks.
- Append to a specific timecode of the existing tracks places the new clips at the timecode entered in the dialog.
Use append-at-end for quick continuation of a program, and use append-to-timecode when you are conforming audio to a known edit point or external picture reference.
Automation Recording
You can record spatial automation directly within SPAT Revolution while the transport is playing. This captures real-time changes to source properties (position, gain, etc.) as automation data on the timeline.
Here is how it works:
Select an automation mode — Select the source(s) you want to record automation for and choose an appropriate automation mode (touch, or write for example).
Start playback and move sources — Press record on the transport and start making changes to the armed sources — move them in the 3D view, adjust their gain, or modify any other property. All changes are captured in real time.
Stop recording — When you stop the transport, the recorded automation data is committed to the timeline. If you recorded over a section that already had automation, SPAT Revolution automatically flattens the overlapping clips: the most recently recorded values take priority, and older data is preserved where there is no new recording.
The timeline is saved to disk automatically after each recording pass. For reliable recording, work on the timeline that is currently in Sync mode so the main transport, playhead, waveform display, and automation data all refer to the same timeline.
You can make multiple recording passes on the same timeline. Each pass creates new automation data, and the flatten operation ensures that overlapping regions are resolved cleanly — the latest recording always wins.
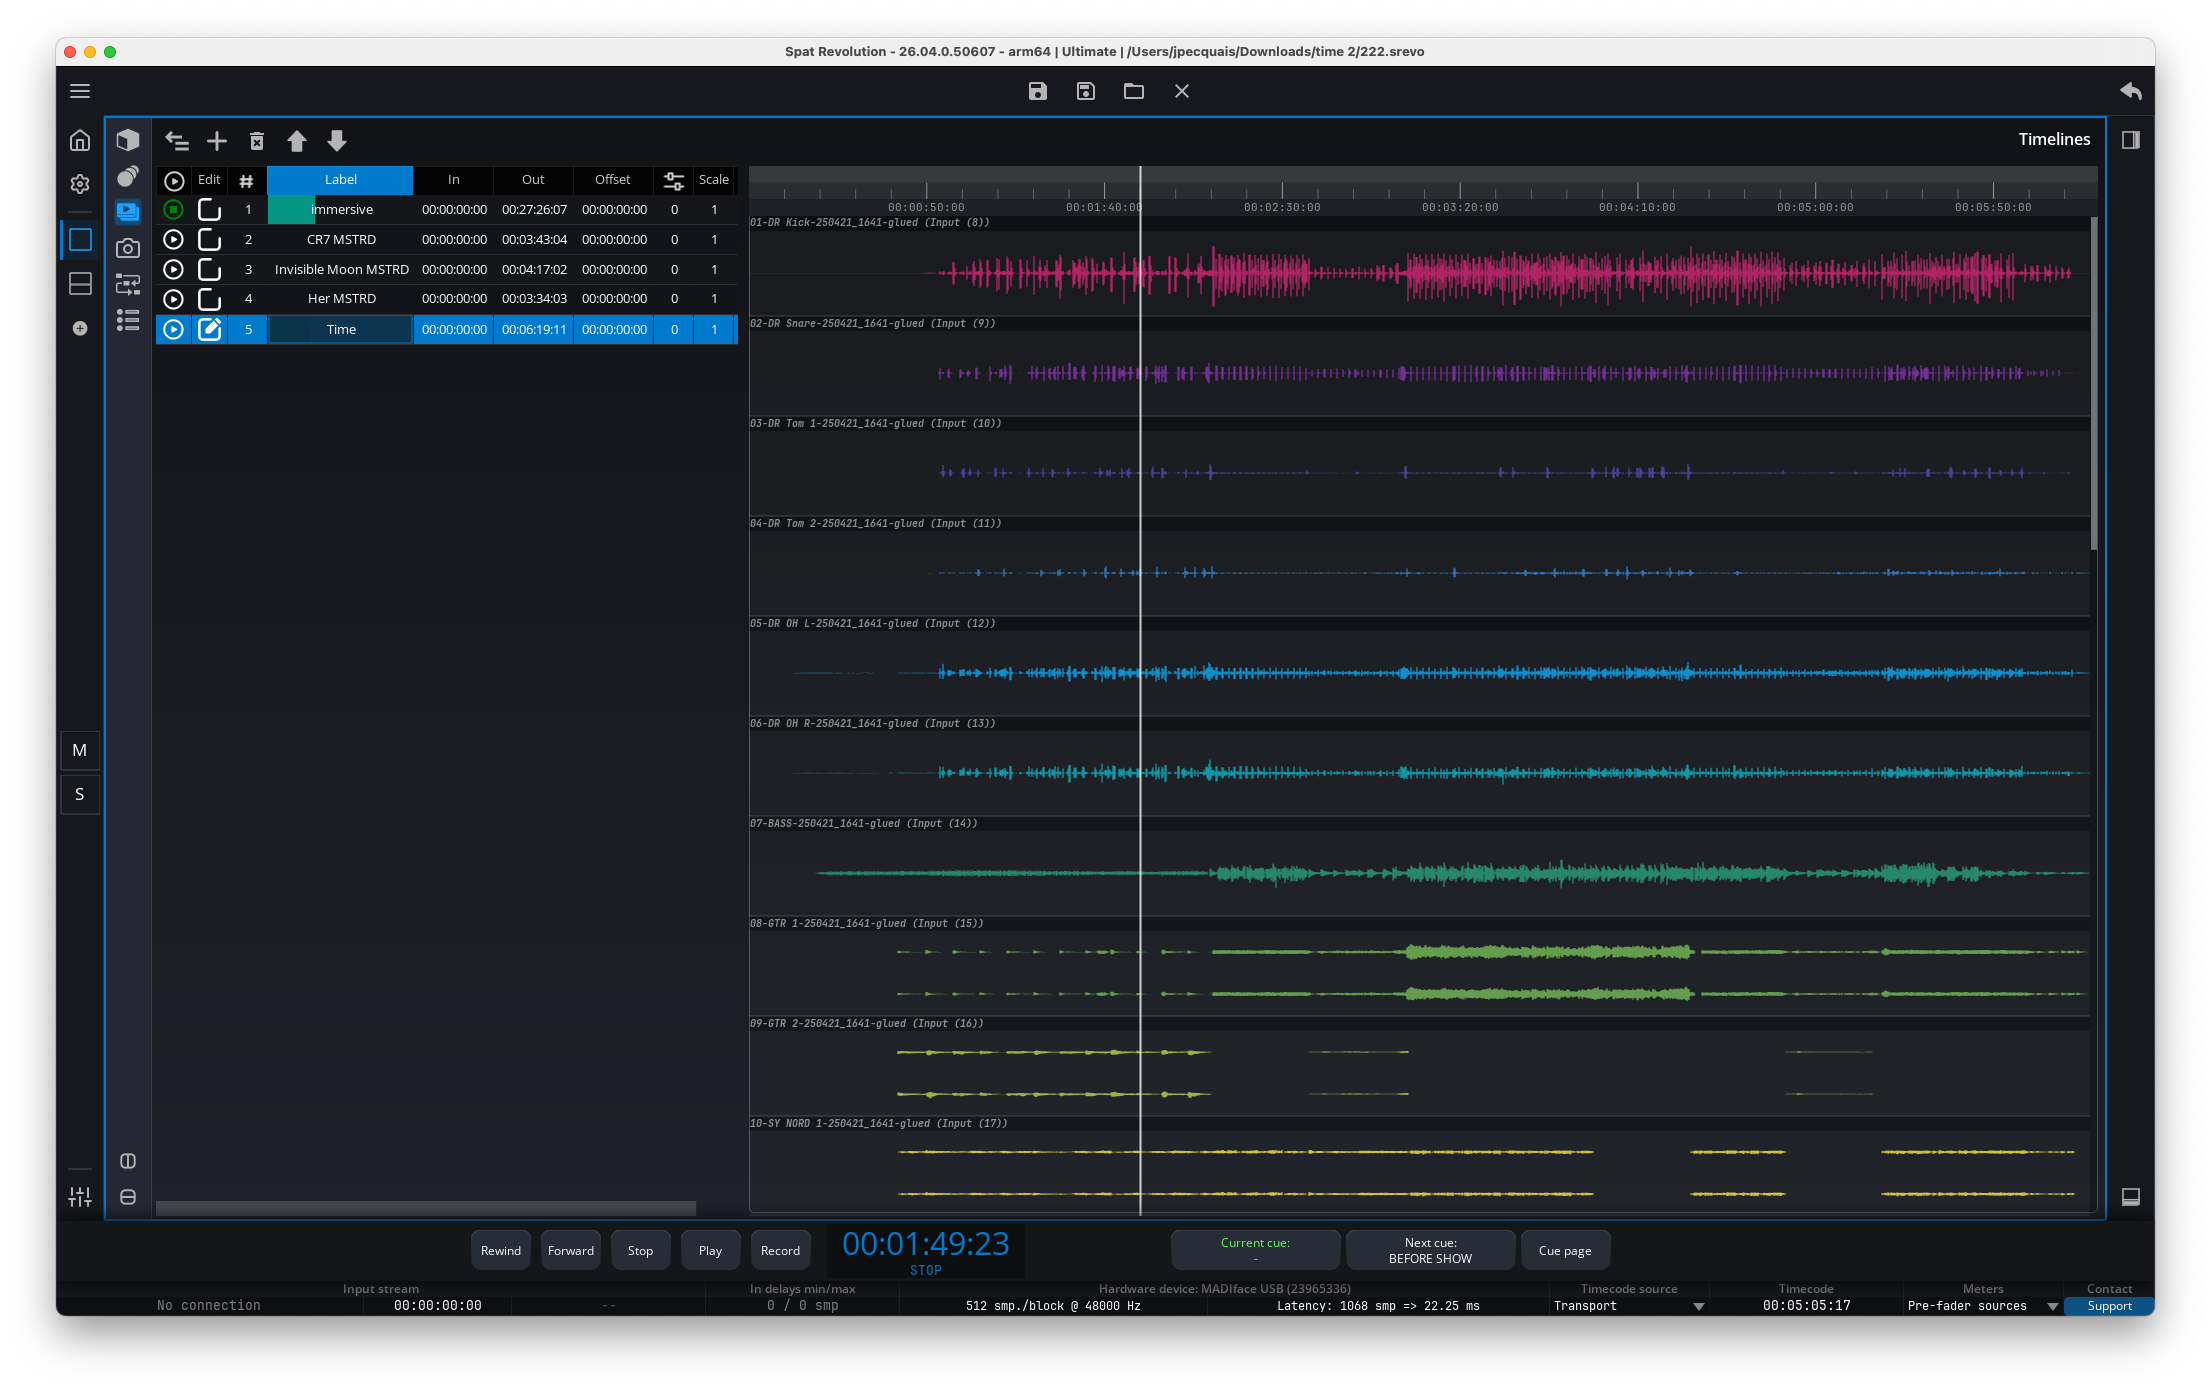
Timeline Page
The Timeline panel can be displayed inside any user-defined page by selecting it from the panel toolbar (see User Interface). The panel is divided into two main areas: the timeline list on the left and the waveform view on the right.
Toolbar
A toolbar at the top provides the main timeline management actions:
Fold— Collapse or expand the timeline list. When folded, the waveform view takes up the full width.Add— Import a media file. This opens a file dialog where you select an audio file, and a new timeline is created from it.Duplicate— Duplicate the selected timeline(s).Delete— Delete the selected timeline(s). If the timeline is referenced by cue actions, a warning dialog will appear listing which cues use it, so you don’t accidentally break your show.Move Up/Move Down— Reorder timelines in the list.
Timeline list
The timeline list shows all your timelines as rows. Each row displays the timeline properties (Play, Sync, Number, Label, In/Out, Offset, Gain, Scale, Remote Number, Loop). The timeline in sync mode is visually highlighted so you can always see which one is active.
Waveform view
When you select a single timeline, the right side of the page displays the waveform view, showing:
- Track lanes — Horizontal lanes for each track, showing their clips.
- Clip waveforms — Audio waveform visualization within each clip’s boundaries.
- Time ruler — A timecode ruler at the top with frame-accurate markings.
- Playback cursor — A vertical line showing the current playback position.
- Scroll and zoom — Vertical scrolling for navigating many tracks, and horizontal zoom for adjusting the visible time range.
Waveform Building and Cache State
Waveforms are generated from the imported media and cached per media file and track. When SPAT Revolution already has a waveform object for a media track, it reuses it immediately. Otherwise, it first tries to load the waveform from the cache. If no cache is available, uncached tracks are built in the background in a batch pass, and a progress job named Building waveforms: filename is shown while the audio file is read.
Large multichannel files can therefore take a moment before all waveforms appear. This is normal and does not mean that playback is blocked. If a clip has missing or invalid media, there is no audio file to analyze and the waveform cannot be drawn until the media is reconformed. If a waveform does not appear after relinking media, reopen the session or reselect the timeline so SPAT Revolution requests the waveform again from the refreshed media path.
Using Timelines with the Cue System
Timelines can be controlled automatically using the Cue System. By adding a Timeline action to a cue, you can:
- Play a timeline — optionally setting the play mode to
Play Once,Loop Infinite, orLoop N Times(with a configurable loop count from 1 to 1,000). - Pause a timeline.
- Set In Timecode — Define the start point of the playback region to a specific timecode.
- Set Out Timecode — Define the end point of the playback region.
For example, you could set up a cue that starts a background ambience timeline on infinite loop when your show begins, and another cue that pauses it during a quiet scene.
OSC Remote Control
Timelines can be controlled remotely via OSC using the /timeline/[remote_number]/ address pattern. For example, if a timeline has remote number 2, you would use /timeline/2/play to start it.
The following OSC addresses are available:
| OSC Address | Description |
|---|---|
/timeline/[N]/dump |
Requests SPAT Revolution to send back all properties for timeline N. |
/timeline/[N]/name |
Gets or sets the timeline name. |
/timeline/[N]/play |
Gets or sets the play state (send 0 to stop, 1 to play). |
/timeline/[N]/edit |
Gets or sets the sync state (send 0 to exit sync mode, 1 to enter sync mode). |
Additionally, two global OSC addresses let you query information about all timelines:
| OSC Address | Description |
|---|---|
/project/timeline/count |
Returns the total number of timelines in the session. |
/project/timeline/remotenumber |
Returns the list of all timeline remote numbers. |
Saving and Loading Timelines
All timeline data is automatically saved as part of your SPAT Revolution session file (.json). This includes:
- All timeline properties (label, number, in/out points, offset, gain, scale, loop count, playback mode, sync state).
- All tracks with their clips and automation data.
- All markers.
When you reopen the session, all your timelines are restored exactly as you left them.
Timelines can also be saved and loaded individually to and from separate files, allowing you to reuse timeline configurations across different sessions.
Missing Media and Reconform
When a session is loaded, SPAT Revolution checks that every audio file referenced by timeline clips can still be found on disk. Files may become unreachable if they were moved, renamed, or if the session was transferred to a different machine. The system handles this in two stages: automatic relinking at load time, and a manual reconform dialog for anything that remains unresolved.
Automatic Relinking
During session loading, SPAT Revolution tries to locate each missing media file using a seven-strategy waterfall. The strategies are attempted in order, and the first successful match is used:
| Strategy | Description |
|---|---|
| 1. Original path | The file still exists at the absolute path stored in the session |
| 2. Session folder | Same filename found in the session file’s directory |
| 3. Media subfolder | Same filename found in the media/ subfolder next to the session |
| 4. Relative path | If the stored path looks relative, resolve it from the session folder |
| 5. Preserve structure | Match subdirectory names (e.g., audio/, samples/, sounds/) relative to the session |
| 6. Parent directories | Walk up to 3 parent folders from the session, checking directly and in media/ subfolders |
| 7. Recursive search | Full recursive scan of the session folder tree for a filename match (case-insensitive) |
Media Reconform Dialog
If some files remain missing after automatic relinking, the Media Reconform Dialog opens. It presents a grid listing every unresolved media file:
| Column | Content |
|---|---|
| Status | Green indicator when the file has been successfully resolved |
| File Path | The original path stored in the session |
| Reconformed Path | The new path after relinking |
| Clips | Number of clips referencing this file |
Four action buttons are available:
- Locate File — Opens a file browser to manually select the replacement file for the selected entry.
- Scan Folder — Picks a folder and recursively searches it for
.wav/.bwffiles, auto-matching unresolved entries by filename (case-insensitive). This is useful for batch relinking when files have been moved to a new location. - Search & Replace… — Opens a sub-dialog with Find and Replace text fields. Performs a string substitution on the original paths and verifies that the resulting path exists before relinking. This is ideal when only the root folder has changed (e.g.,
/old/server/→/new/server/). - Skip All / Validate — Closes the dialog. The button text changes to Validate once all entries are resolved.
After each successful relink, the focus automatically advances to the next unresolved entry, and the grid refreshes in real time.
Reconform Workflow
Use the reconform tools from broadest to most specific:
- If all files moved together, use Search & Replace… and replace the old root path with the new one. The replacement is applied only when the resulting file exists.
- If the files are in a new folder tree but the names are unchanged, use Scan Folder. SPAT Revolution recursively scans for
.wavand.bwffiles and matches unresolved entries by filename, case-insensitively. - If one file needs a manual choice, select its row and use Locate File. The selected file is loaded, and all clips that referenced the missing file are relinked to it.
- When every row is resolved, the Skip All button changes to Validate. Validate to continue opening the session with the new media paths. Use Skip All only when you intentionally want to open the session with unresolved clips.
Screenshots to capture: spat-timeline-reconform-dialog.png, spat-timeline-reconform-search-replace.png, and spat-timeline-reconform-report.png.
Session Report
When the Media Reconform Dialog is closed, a summary is appended to the session opening report indicating how many files were resolved and listing the status of each entry. You can review this report from the session log.
Multiple Timeline Mixing
When multiple timelines contain tracks that reference the same input or source, their audio data is additively mixed. This means you can layer multiple timelines on top of each other — for example, combining a dialogue timeline with an ambience timeline that both feed into the same source — and their audio will be summed together automatically.