Cue System
The Cue system in SPAT Revolution is a powerful show-control automation tool. Think of a cue as a programmable event: when something happens (a timecode is reached, an OSC or MIDI message is received, or you press a button), SPAT Revolution executes a sequence of actions you have defined — such as recalling a snapshot, changing a source’s position, sending a message to an external device, and more.
Cues are the backbone of live performance and post-production workflows in SPAT Revolution. For example, during a live concert, you could set up cues to automatically transition between different spatial mixes for each song, triggered by timecode from your DAW or by a MIDI footswitch on stage.
Cue Panel
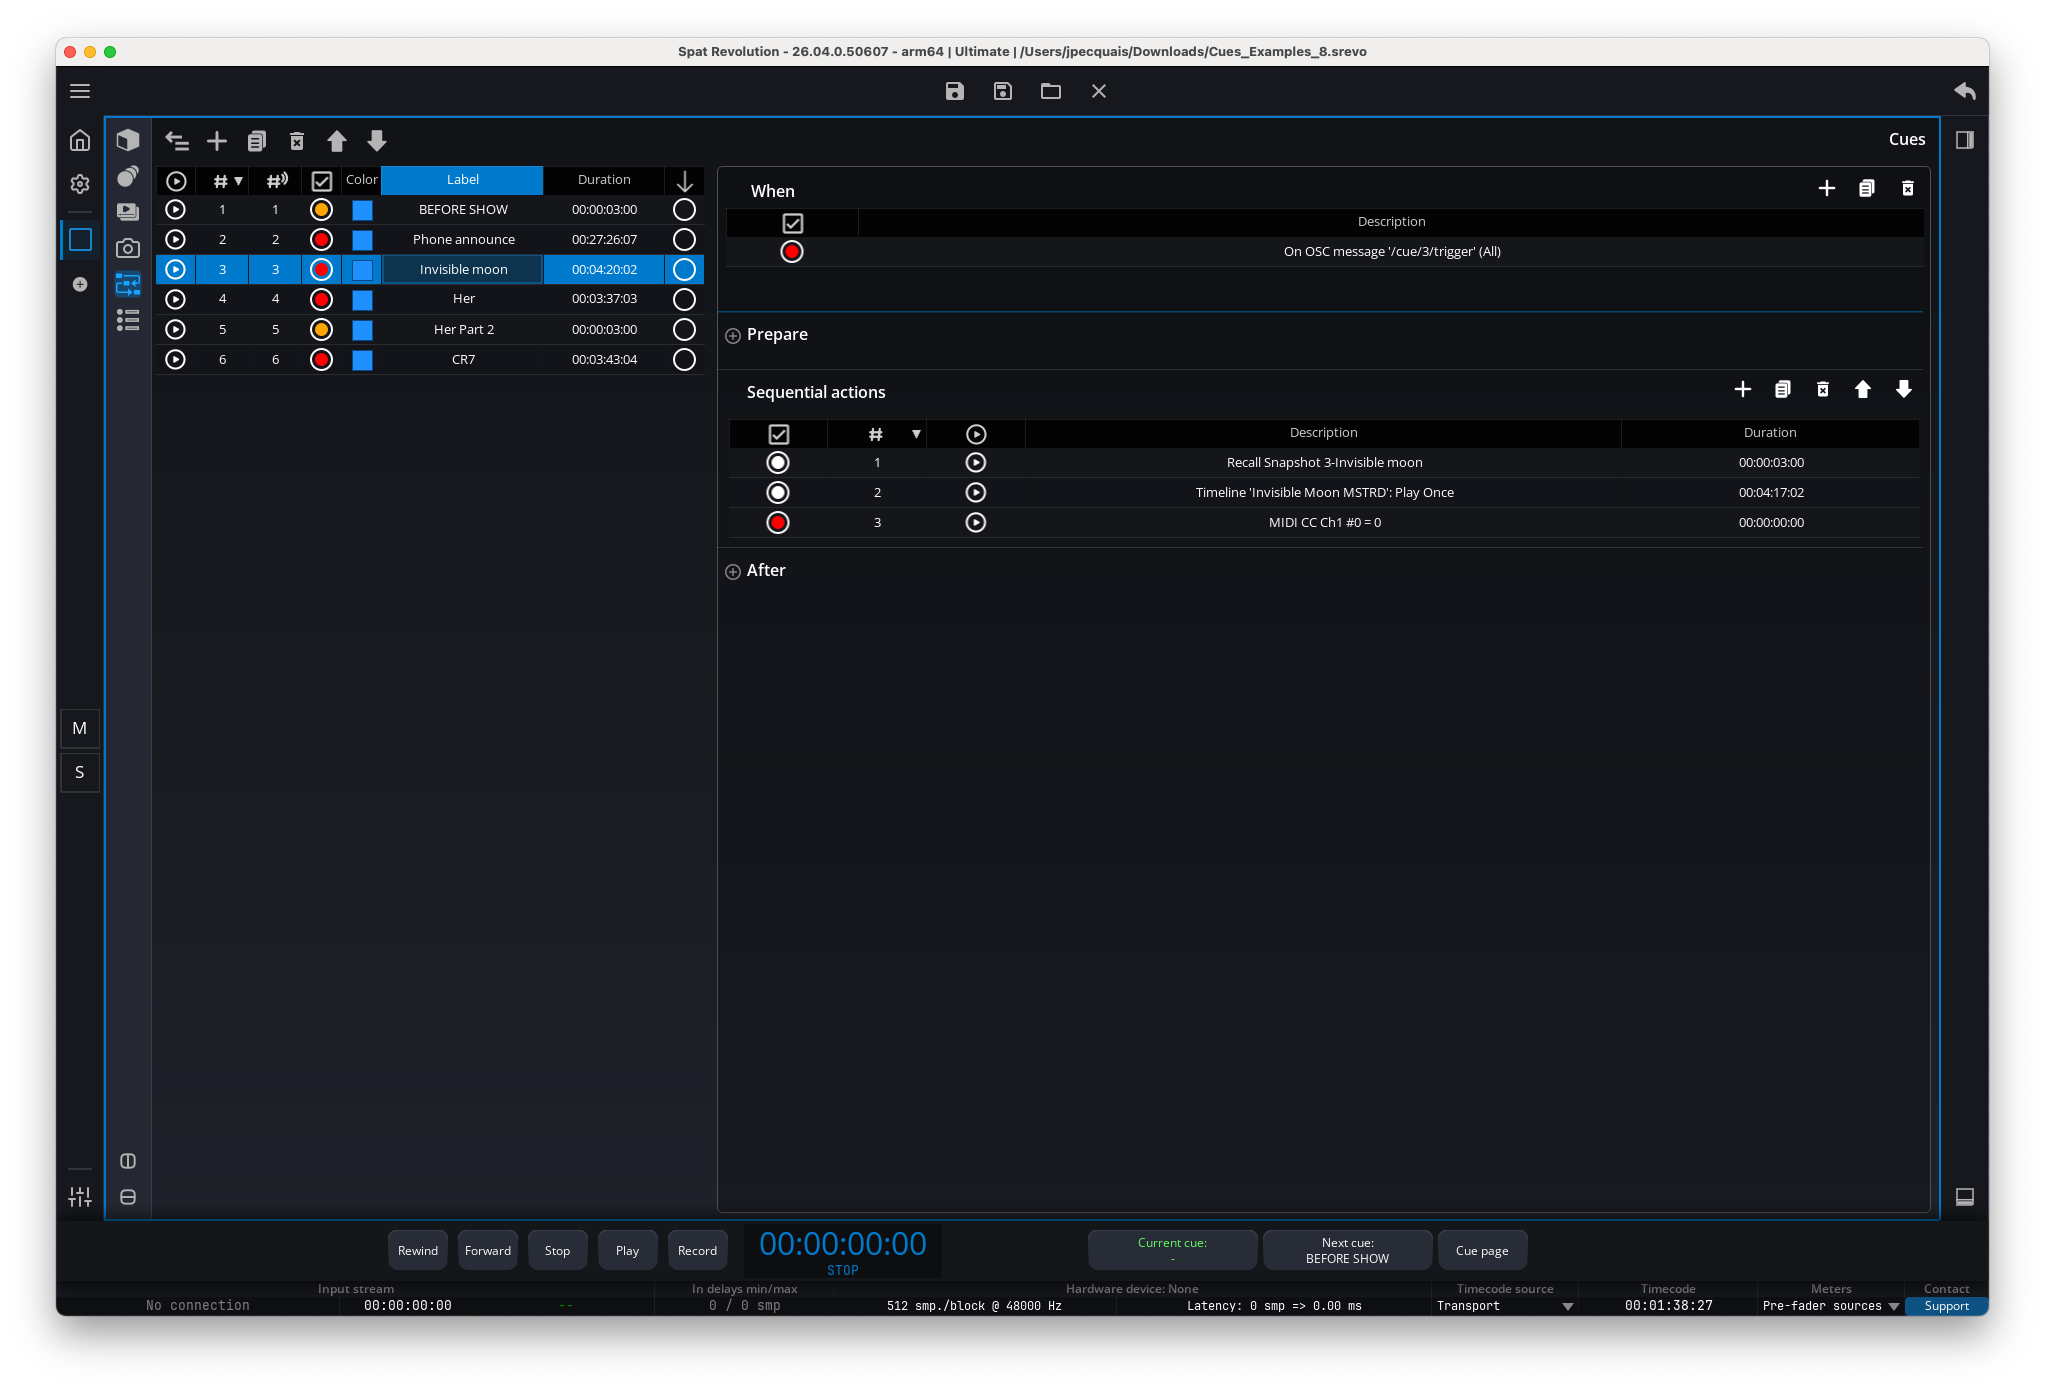
The Cue panel can be displayed inside any user-defined page by selecting it from the panel toolbar (see User Interface). The panel is divided into two main sections: the cue list on the left and the cue editor on the right.
The cue list displays all your cues in order. Selecting a cue in the list reveals its details in the editor, where you can configure triggers and actions.
Toolbar
A toolbar at the top of the page provides the main cue management actions:
Fold— Collapse or expand the cue list. When folded, the editor takes up the full width of the page.Add— Create a new cue.Duplicate— Duplicate the selected cue(s).Delete— Delete the selected cue(s). If the cue is referenced by other cues (for example, via a Start Cue action), a safety dialog will warn you before deleting.Move Up/Move Down— Reorder cues in the list.
Keyboard shortcut
- Space — Triggers the currently focused cue and automatically advances the selection to the next one. This is very useful for stepping through cues during a rehearsal.
Cue Properties
Each cue in the list has several properties that you can view and edit directly in the cue list grid:
- Trigger — Click this toggle to manually trigger the cue.
- Number — The display order of the cue in the list (1, 2, 3…). This number is automatically updated when you reorder cues.
- Remote Number — A unique identifier used for OSC remote control (for example,
/cue/5/triggertargets the cue with remote number 5). Unlike the display number, you can freely edit the remote number to match your show control setup. - Active — Enables or disables the cue. A disabled cue cannot be triggered by any means (manual, OSC, MIDI, or timecode). If the active button is white, all configured commands and triggers inside the cue are properly set up. If it is orange, some commands or triggers need attention. If it is red, the cue contains an error, commonly a missing or disabled OSC or MIDI I/O port.
- Color — A visual color tag to help you organize your cues (for example, you could use blue for verse cues and red for chorus cues).
- Label — A custom name for the cue. New cues are named “New Cue” by default.
- Duration — The total duration computed from all enabled actions in the cue. This is read-only and updates automatically.
- Continue — When enabled, the next cue in the list is automatically triggered once this cue finishes executing. This is useful for creating chains of cues that play back-to-back.
The Remote Number is independent of the cue’s position in the list. You can reorder cues without breaking your OSC or show control addressing.
Cue Editor Workflow
The editor on the right side of the panel follows the same structure as the cue engine:
- When contains the trigger conditions. Add Timecode, OSC message, or MIDI message triggers from the add menu. A Launch from cue trigger appears automatically when another cue starts this cue.
- Prepare contains actions that start immediately and run in parallel.
- Sequential actions contains the main ordered action list. This section is the best place for Wait actions, snapshot transitions, and any action that must happen after the previous one completes.
- After contains follow-up actions that start in parallel after the sequential section finishes.
Selecting a trigger or action opens its editor in the inspector. Invalid rows expose their reason through the active/status indicator tooltip; common causes are empty OSC addresses, addresses that do not start with /, unavailable OSC sockets, missing MIDI input/output ports, out-of-range MIDI values, missing timelines, or deleted target cues.
Trigger Conditions (When)
Each cue can have one or more trigger conditions. If any of the conditions is met, the cue fires. You can combine multiple triggers on the same cue — for example, a cue could fire when a timecode position is reached or when a specific OSC message is received, whichever happens first.
Timecode
A timecode trigger fires the cue when the SPAT Revolution transport playhead reaches a specific time position, set in HH:MM:SS:FF format (hours, minutes, seconds, frames).
The SPAT Revolution transport must be playing for timecode triggers to work. If the transport is stopped or paused, timecode triggers will not fire.
For example, if you set a timecode trigger to 00:01:30:00, the cue will fire automatically when playback reaches 1 minute and 30 seconds.
OSC Message
An OSC trigger fires the cue when SPAT Revolution receives a matching OSC message on the configured socket.
- Socket — Choose which OSC input socket to listen on. By default, this is set to
All Sockets, meaning the cue will respond to the message from any configured OSC input. - Address — The OSC address pattern to match, for example
/cue/1/trigger. The address must start with/and cannot contain spaces.
Every new cue automatically gets a default OSC trigger with the address /cue/[remote_number]/trigger. For instance, a cue with remote number 3 will respond to /cue/3/trigger out of the box.
You can use the OSC Learn feature to set up a trigger quickly: click Learn, then send the OSC message you want to use from your controller, and SPAT Revolution will capture the address automatically.
Keep OSC trigger addresses specific enough to avoid accidental firing. A valid address starts with /; empty addresses and malformed patterns are marked invalid in the cue grid.
MIDI Message
A MIDI trigger fires the cue when SPAT Revolution receives a matching MIDI message on the MIDI input port configured in the MIDI I/O preferences MIDI I/O. You can configure the following:
- Type — The type of MIDI message:
Note On,Note Off,Control Change, orProgram Change. - Channel — The MIDI channel (1–16).
- Number — The note number, CC number, or program number (0–127).
- Value — The velocity (for notes) or CC value. This is not used for Program Change messages.
For example, you could set a cue to trigger on MIDI Note On, Channel 1, Note 60 (Middle C). This way, pressing Middle C on a MIDI keyboard or footswitch will fire the cue.
Just like OSC, MIDI triggers support a Learn mode: click Learn, send the desired MIDI message from your controller, and it will be captured automatically.
Launch from Cue
This trigger type is not manually created — it appears automatically when another cue contains a Start Cue action that targets this cue. It serves as a visual reference in the When panel, showing you which cue will trigger this one.
For example, if Cue 5 has a Start Cue action targeting Cue 8, then Cue 8 will show a “Launch from Cue 5” trigger in its When section.
Because launch-from-cue triggers are generated references, edit the source cue’s Start cue action when you want to change or remove the relationship.
Action Types
Actions are the things a cue actually does when it fires. SPAT Revolution offers nine different action types, and you can place any of them in any of the three action sections: Prepare, Sequential, or After (see Cue Execution Flow below for how these sections work together).
Use the action add menu to create Snapshot recall, Object action, Send MIDI, Send OSC message, Start cue, Timeline action, Transport action, Animation action, or Wait action. The editor changes according to the selected action, so start by choosing the action type that matches the external system or SPAT object you need to control.
Snapshot Recall
This action recalls a previously saved snapshot, applying all its stored property values to your session (source positions, reverb settings, levels, etc.).
You select the snapshot to recall from a dropdown that lists all available snapshots as Remote Number - Name.
The recall duration (how long the transition takes) is determined by the snapshot’s own recall timing setting — either the session default or a per-snapshot override. The recall scope (which sources, rooms, and masters are affected) follows the snapshot’s configured recall scope. For more details on snapshots, see the Snapshots page.
When placed in the Sequential section, the next action only starts after the snapshot recall interpolation has completed. This ensures smooth transitions.
Object Action
This action lets you directly control a specific property on one or more audio objects — for example, changing the gain of a source, moving a source to a new position, or muting a room.
- Object Type — Choose the type of object to control:
Input,Input Transcoder,Source,Room,Master,Master Transcoder, orMonitor. - Property — The parameter you want to change. The available properties depend on the object type. For a source, this includes Gain, Position X/Y/Z, Azimuth, Elevation, Distance, LFE sends, Reverb parameters, and more.
- Value Mode — Choose between
Absolute(set the property to an exact value) orRelative(add or subtract from the current value, in a range of −100 to +100). Relative mode is not available for on/off (boolean) properties. - Target Value — The value to apply. For on/off properties, this is simply On or Off. For position properties like XYZ, you enter three values.
- Integration Time — The transition duration in seconds. Set to 0 for an instant change, or use a higher value (up to 60,000 seconds) for a smooth transition over time. Not available for on/off properties.
- Target Scope — Choose which object(s) to affect:
Specific Object— targets a single object, selected by its remote number.All Objects— targets every object of the selected type.Selected Objects— targets only the currently selected objects in the UI (available for Sources only).
- Interpolation Curve — Controls the shape of the transition:
Linear,Ease In,Ease Out,Ease In/Out, orS-Curve. For example, Ease In/Out produces a smooth acceleration and deceleration. - Object — When the scope is set to Specific Object, a dropdown lets you pick the target object from a list shown as
RemoteNumber - Name.
For example, to smoothly fade the gain of Source 1 from its current level to −6 dB over 3 seconds, you would set: Object Type = Source, Property = Gain, Value Mode = Absolute, Target Value = −6, Integration Time = 3, Target Scope = Specific Object, Object = Source 1, Interpolation Curve = Linear.
Start Cue
This action triggers one or more other cues, allowing you to build complex cue chains and parallel execution.
- Mode — Choose between
Selected cue(triggers all checked cues simultaneously) orRandom in selection(triggers one randomly chosen cue from the checked list — great for randomized sound design). - Cue — A checklist of all your cues. Check the ones you want this action to target.
Only enabled cues are actually triggered; any disabled cues in the selection are simply skipped. When you set up a Start Cue action targeting another cue, a Launch from Cue reference automatically appears in the target cue’s When section so you can easily see the relationship.
If you try to delete a cue that is referenced by Start Cue actions in other cues, SPAT Revolution will show a warning dialog listing all the cues that reference it, so you don’t accidentally break your cue chain.
Wait
This action inserts a timed pause in the sequential chain. The duration can be set from 0 to 3,600 seconds (1 hour) with millisecond precision. The default is 1 second. The duration is displayed in HH:MM:SS:FF format.
For example, you could use a Wait action to add a 2-second pause between a snapshot recall and a source gain change, giving the audience time to settle into the new scene.
Send OSC Message
This action sends an OSC message to an external device or application — for example, to trigger a lighting cue on another system, or to send a command to a show control application like QLab.
- Socket — The OSC output socket to send from, shown as
Name - IP:Port. - Pattern — The OSC address pattern (for example,
/my/osc/path). Must start with/and cannot contain spaces. - Argument Type — The type of value to send:
None,Boolean,Integer,Float, orString. - Value — The value to send along with the message. The format depends on the argument type (for example, true/false for Boolean, or a number for Integer/Float).
Send MIDI
This action sends a MIDI message to the MIDI output port configured in the MIDI I/O preferences MIDI I/O — useful for controlling external MIDI devices, lighting desks, or other software.
- Port — The MIDI output port to send to.
- Type —
Control ChangeorProgram Change. - Channel — MIDI channel 1–16.
- CC Number / Program — The controller number or program number (0–127).
- Value — The CC value (0–127). Only shown for Control Change messages.
Transport
This action controls the SPAT Revolution internal transport (play, pause, stop).
- Action — Choose from:
Play— start playback.Pause— pause playback.Stop— stop playback and reset to the beginning.Toggle Play/Pause— switch between play and pause.Play From— jump to a specific timecode and start playback from there.
- Timecode — Only shown when using Play From. Enter the position in
HH:MM:SS:FFformat.
Timeline
This action controls timeline playback, giving you fine-grained control over how timelines play back within your session.
- Timeline — Select which timeline to control from the dropdown.
- Action — Choose from:
Play— start timeline playback.Pause— pause the timeline.Set In Timecode— define the start point of the timeline.Set Out Timecode— define the end point of the timeline.Set Repeat Count— configure how the timeline repeats.
- Repeat Mode — Only shown for Set Repeat Count: choose
Play Once,Loop Infinite, orLoop N Times. - Loop Count — Only shown when using Loop N Times: set the number of extra loops after the first play, from 1 to 1,000.
- Timecode — Only shown for Set In/Out Timecode. Enter the position in
HH:MM:SS:FFformat.
Animation
This action controls source animation playback and assignment, allowing you to start, pause, or assign sources to animations directly from a cue.
- Animation — Select the animation from a dropdown (shown as
Index - Name), or chooseNone. - Action — Choose from:
Play— start the animation.Pause— pause the animation.Assign Sources— assign specific sources to the animation.Unassign Sources— remove specific sources from the animation.
- Sources — Only shown for Assign/Unassign Sources. A checklist of all sources (shown as
Number - Name) lets you select which ones to assign or unassign.
Cue Execution Flow
Understanding how a cue executes its actions is key to building effective cue sequences. Each cue organizes its actions into three sections that run in a specific order:
Prepare — All actions in this section start simultaneously (in parallel) as soon as the cue is triggered. Use this for things that should happen right away and don’t need to wait for each other — for example, sending an OSC message to an external lighting desk while also starting a source animation.
Sequential — After the Prepare actions have started, the actions in this section run one after another, in order. Each action waits for the previous one to finish before starting. This is where you place actions that depend on timing — for example, recalling a snapshot, waiting 2 seconds, then changing a source’s gain.
After — Once all Sequential actions have completed, the actions in this section start simultaneously (in parallel), just like Prepare. Use this for cleanup tasks or follow-up actions — for example, sending an OSC notification to an external system that the cue has finished.
If the cue’s Continue option is enabled, the next cue in the list is automatically triggered once the After actions have started.
How timing works in the Sequential section
In the Sequential section, each action’s duration determines how long SPAT Revolution waits before moving on to the next action:
- For a Snapshot Recall, the duration is the snapshot’s recall interpolation time.
- For a Wait action, the duration is the configured wait time.
- For actions that execute instantly (such as Send OSC, Send MIDI, or Start Cue), the next action follows immediately.
If an action fails to execute for any reason, the sequential chain simply moves on to the next action without waiting.
Sequential pool guidance
Use Prepare for independent setup work, Sequential actions for timing-critical changes, and After for cleanup or notifications. A practical show cue often looks like this:
- In Prepare, send an OSC message to a lighting desk and start an ambience timeline.
- In Sequential actions, recall a snapshot, wait two seconds, then move or fade selected sources.
- In After, send a completion message or start the next cue group.
Place Wait actions only where elapsed time matters. Send OSC, Send MIDI, Start cue, Transport, Timeline, and Animation actions are normally instantaneous from the cue sequencer’s perspective, so putting several of them in the sequential section does not add spacing unless you add a Wait or a timed snapshot/object interpolation between them.
Cue Control Bar
The Cue Control Bar is a compact panel embedded in the transport area at the bottom of the SPAT Revolution window. It gives you quick access to cue operations without having to navigate to the Cues page — very handy during a live show or rehearsal.
Enabling the Cue Control Bar
You can toggle the Cue Control Bar from the View menu.
The Cue Control Bar and the Snapshot bar are mutually exclusive — enabling one automatically disables the other.
Using the Cue Control Bar
The bar contains three buttons:
Current cue (green) — Displays the name of the last triggered cue (or “-” if none has been triggered yet). Clicking this button opens a popup menu listing all your cues. A checkmark (✓) marks the currently active cue. You can select any cue from this list to trigger it. Disabled cues appear grayed out.
Next cue — Displays the name of the next cue that will be triggered. Clicking this button triggers that cue and automatically advances to the following one. If there is no next cue available, the button shows “-” and is disabled.
Cue page — A small button that navigates directly to the Cues page.
How the “next cue” is determined
SPAT Revolution determines which cue is “next” using this logic:
- If a cue was previously triggered, the next cue is the next enabled cue after it in the list.
- If no cue has been triggered yet, it uses the currently selected and enabled cue.
- If nothing is selected, it defaults to the first enabled cue in the list.
- If there are no more enabled cues after the current one, the Next button shows “-” and is disabled.
The Cue Control Bar automatically updates its labels and button states whenever cues are added, removed, renamed, triggered, or when their properties change (enabled/disabled, label, etc.).
OSC Remote Control
Each cue can be remotely controlled via OSC messages. All OSC addresses use the cue’s remote number as an index (not the display number). For example, if a cue has remote number 5, you would use /cue/5/trigger to trigger it.
The following OSC addresses are available:
| OSC Address | Description |
|---|---|
/cue/[N]/trigger |
Triggers the cue with remote number N. |
/cue/[N]/enable |
Gets or sets the enabled state of cue N (send 1 to enable, 0 to disable). |
/cue/[N]/name |
Gets or sets the label of cue N. |
/cue/[N]/dump |
Requests SPAT Revolution to send back all properties for cue N. |
For example, to trigger the third cue in your show from an external show control application like QLab, you would send the OSC message /cue/3/trigger to SPAT Revolution’s OSC input.
Saving and Loading Cues
Cues are automatically saved as part of your SPAT Revolution session file (.srevo). When you save your session, everything about your cues is preserved:
- All cue properties (label, remote number, color, enabled/disabled state, continue flag).
- All trigger conditions and their settings.
- All actions in all three sections (Prepare, Sequential, After) with their full configuration.
- The currently selected cue and the cue list panel visibility (folded/unfolded).
When you reopen the session, all your cues are restored exactly as you left them.
Cues reference snapshots and animations by their internal identifiers, so renaming a snapshot or animation will not break any cue references.